Category: How-To

  • How to set up SNMP monitoring (snmpd) on Ubuntu 12.04


    This one caused a bit of hassle recently – a few online guides don’t seem to work with the current version of Ubuntu. We found that this works, at least in the ~10 or so servers we have tried so far:


    sudo apt-get install snmpd


    Back up your snmpd.conf file:


    sudo mv /etc/snmp/snmpd.conf /etc/snmp/snmpd.conf.old


    Create a new file:


    sudo touch /etc/snmp/snmpd.conf


    Edit with your chosen editor and put in the following:


    rocommunity public

    syslocation “Describe the server’s location”

    syscontact [email protected]


    Save and exit. Now edit the following file:


    /etc/default/snmpd


    Comment out the following line by putting a # before it:


    SNMPDOPTS=’-Lsd -Lf /dev/null -u snmp -g snmp -I -smux -p /var/run/snmpd.pid’


    On the next blank line add the following:


    SNMPDOPTS=’-Lsd -Lf /dev/null -u snmp -I -smux -p /var/run/snmpd.pid -c /etc/snmp/snmpd.conf’


    Save the file and restart the SNMP daemon:


    sudo /etc/init.d/snmpd restart


    Now you should be able to successfully snmpwalk locally and from machines on the local network.

  • Ubuntu: How to update PHP’s timezone


    We came across this one recently when setting up a Zabbix server, where the installation would not proceed until the PHP timezone was set. This is quite straightforward – using your favourite editor edit:


    /etc/php5/apache2/php.ini


    Look for the Module Settings section or search for:


     date.timezone


    (in vi /date.timezone should get you there). Uncomment the line by removing the leading ; and then add in your desired timezone. For Sydney it would look like:


    [Date]

    ; Defines the default timezone used by the date functions

    ; http://php.net/date.timezone

    date.timezone = UTC+10


    Change UTC+10 to your desired timezone, save the file and restart Apache:


    sudo service apache2 restart


    Voila!

  • How to remove/delete old or unused kernels in Ubuntu


    If you have upgraded your kernel you will have found that Ubuntu keeps the older ones around, which can be handy if something breaks in the newer kernel and you have to boot from your old system. Over time, however, these can add up in terms of the amount of space consumed – at around 150MB per kernel you could easily find yourself with over a GB of old kernels if you’ve upgraded enough times. In this example the system we are using is Ubuntu 12.0.4.2. If you’re using Ubuntu Desktop, open up a terminal window – if you’re using Ubuntu Server, log in as usual and run:


    uname -r

    to see which kernel you are currently running. Make sure not to delete this one. Now, to see a list of the installed kernels, we run:


    dpkg –list | grep linux-image

    This command lists the installed packages and filters the list to include only those which have “linux-image” in them, which should only be your kernels. Your list should look something along the lines of:


    ii  linux-image-2.6.32-33-server 2.6.32-33.72     Linux kernel image for version 2.6.32 on x86_64
    ii  linux-image-3.2.0-35-generic 3.2.0-35.55      Linux kernel image for version 3.2.0 on 64 bit x86 SMP
    ii  linux-image-3.2.0-38-generic 3.2.0-38.61      Linux kernel image for version 3.2.0 on 64 bit x86 SMP
    ii  linux-image-server           3.2.0.38.46      Linux kernel image on Server Equipment.


    To remove a kernel, run the following:


    sudo apt-get purge [kernel]


    Using the above list, say we want to get rid of 3.2.0-35. In that case the command would be:


    sudo apt-get purge linux-image-3.2.0-35-generic


    Once you have removed your unwanted kernels run:


    sudo update-grub2


    This will update the boot menu accordingly.

  • Monitoring network usage on Ubuntu


    If you want to see how much traffic is passing through your network port there’s a handy tool called vnstat which will tally the amount of data passing through. You can install it with:


    sudo apt-get install vnstat


    It will usually add the databases and network ports automatically like so:


    vnstat-0


    If it doesn’t and gives you an error you can create the database(s) with:


    sudo vnstat -u -i eth0


    If you have multiple network cards/ports you can add those in, too:


    vnstat -u -i eth1

    vnstat -u -i eth2

    …etc


    If it couldn’t create the databases you can start it with:


    sudo /etc/init.d/vnstat start


    If you need to change the maximum bandwidth from 100Mb you can edit the file:


    /etc/vnstat.conf


    Scroll down until you see the following:


    # maximum bandwidth (Mbit) for all interfaces, 0 = disable feature
    # (unless interface specific limit is given)
    MaxBandwidth 100


    and make MaxBandwidth the figure you require (e.g. 1000). If you make a change restart vnstat with:


    /etc/init.d/vnstat restart


    You can now see how much traffic has come through the NIC since vnstat started recording – at first it probably won’t be much (if any), but as it adds up you can check it with:


    vnstat


    The output should look like:


    vnstat-01


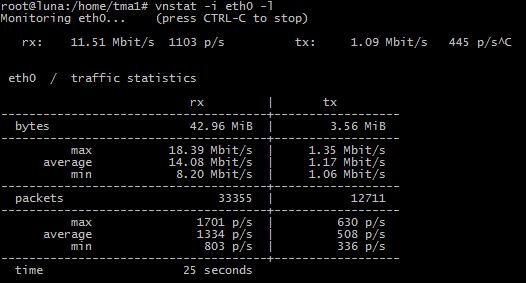
    You can watch how much traffic is flowing through in real-time by running:


    vnstat -i eth0 -l


    This will give you a screen showing you the current traffic:


    vnstat-02


    You can end this with CTRL+C, which shows you a summary screen:


    vnstat-03


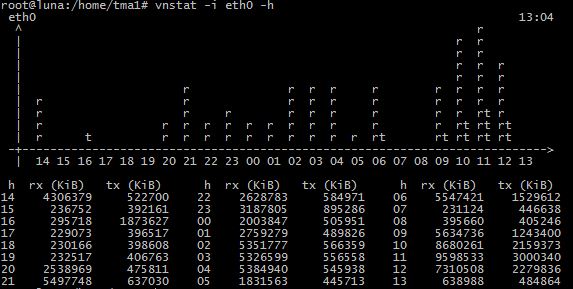
    You can get an hourly summary with:


    vnstat -i eth0 -h


    vnstat-04 vnstat-05


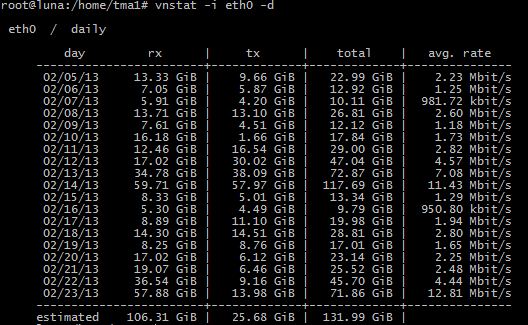
    Daily summary with:


    vnstat -i eth0 -d


    vnstat-04

    Monthly summary with:


    vnstat -i eth0 -m


    vnstat-06


    This is a really handy way of keeping track of your network traffic – whether it’s out of curiosity, wanting to know how much stress your network is under or looking for a bottleneck this can be quite a valuable tool.

  • Setting up one browser remotely, one locally


    As a follow-up to the Firefox and Internet Explorer remote browsing articles we were asked whether you could set IE up for remote browsing and Firefox for local browsing. This certainly can be done – set up your tunnel in Internet Explorer then open up Firefox and go to:


    Tools -> Options -> Advanced -> Network -> Settings -> select No Proxy


    Firefox should now work locally again.

  • Using an SSH tunnel with Internet Explorer


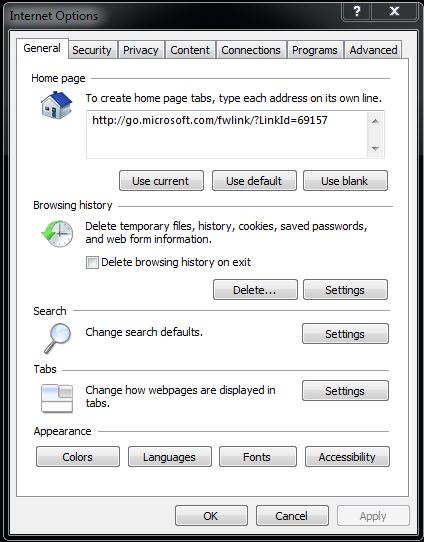
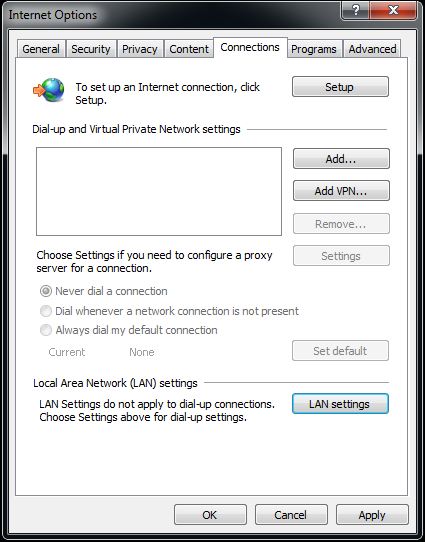
    As a follow-up to the previous article on how to browse the web via an SSH tunnel in Firefox we’ve been asked to show how to do the same with Internet Explorer. The Putty set-up remains the same; once that’s complete, open Internet Explorer (we are using IE 9) and go to Tools -> Internet Options (you may have to hit Alt to bring up the top menu):

    remote-access-ie-01

    Go to Settings:

    remote-access-ie-02

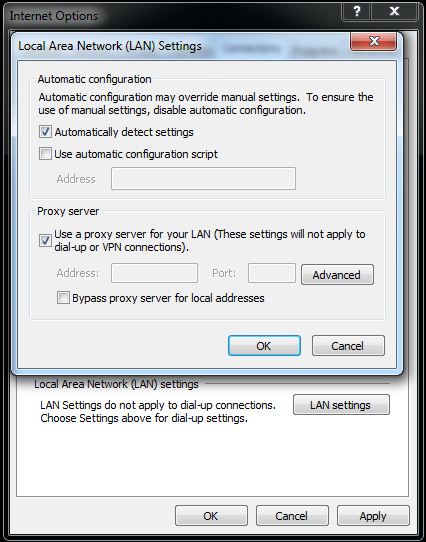
    Choose LAN settings:


    remote-access-ie-03

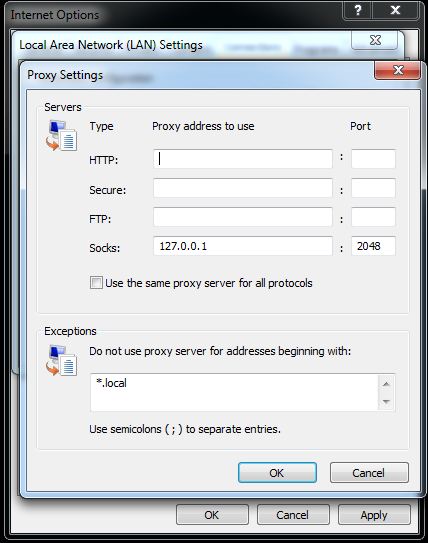
    Tick “Use proxy server for your LAN” and click Advanced:


    remote-access-ie-04

    Make sure the top four lines are blank in all fields except for the SOCKS port – here put:


    127.0.0.1


    and the port we used in Putty:


    2048


    Make sure the “Use the same proxy server for all protocols” box is unticked.


    Hit OK -> OK -> Apply -> OK, open up your SSH tunnel in Putty and you should be ready to browse the internet remotely!

  • Browsing the web through a SSH tunnel with Firefox and Putty (Windows)


    If you have the ability to SSH into a remote machine you also have the ability to direct your web browser’s traffic through SSH to that machine. This can be quite handy for browsing the (remote) local network without opening a HTTP port on the firewall.


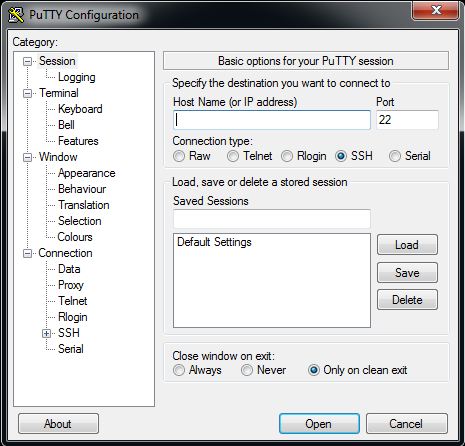
    First, install Putty and Firefox. Putty can be found here and Firefox here. If you’re not sure which file to download for Putty, just go for putty.exe. Once you’ve downloaded Putty, open it and you should see a screen like this:


    putty-01


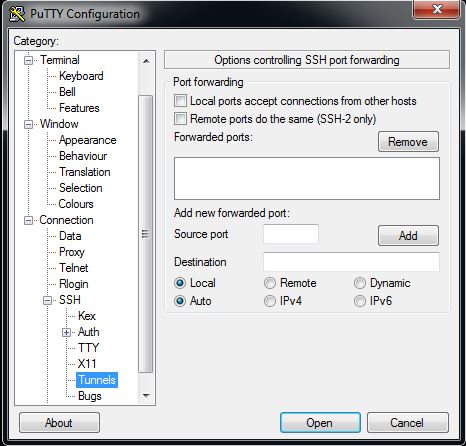
    Enter in the remote computer’s IP address and SSH port number (usually 22 unless you changed it) and test the connection to make sure you can log in. If that works, disconnect and go to Connection -> SSH -> Tunnels like so:


    putty-connection-ssh-tunnels


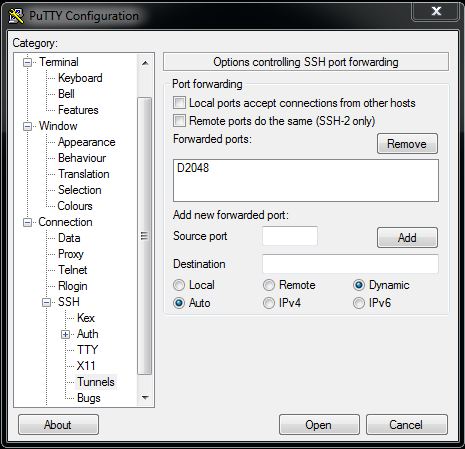
    then change the selection from Local to Dynamic. After that, enter 2048 into the “Source port” field and click Add.  Your screen should now look like:

    putty-source-port


    Note the D in front of the source port number – that should be there.


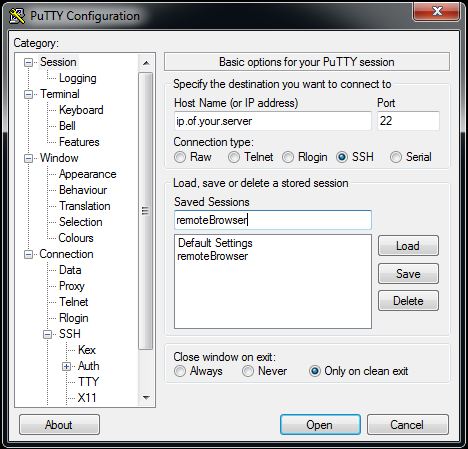
    Scroll back up on the left until you get back to the original Session window. Check the IP address and port numbers and enter a name in the “Saved Sessions” box, then click Save. Now you can load these settings again next time you open Putty.


    putty-save-session


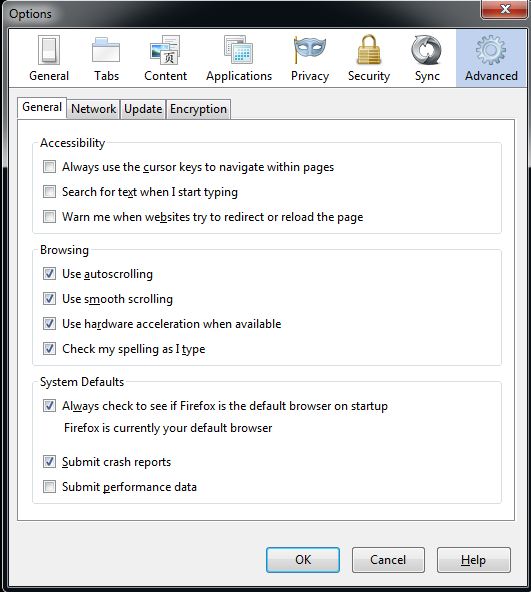
    The version of Firefox we’re using for today’s example is 18.0.2. Go to Tools -> Options -> Advanced (you may have to hit Alt to bring up the Tools menu at the top):


    firefox-options-for-remote-browsing


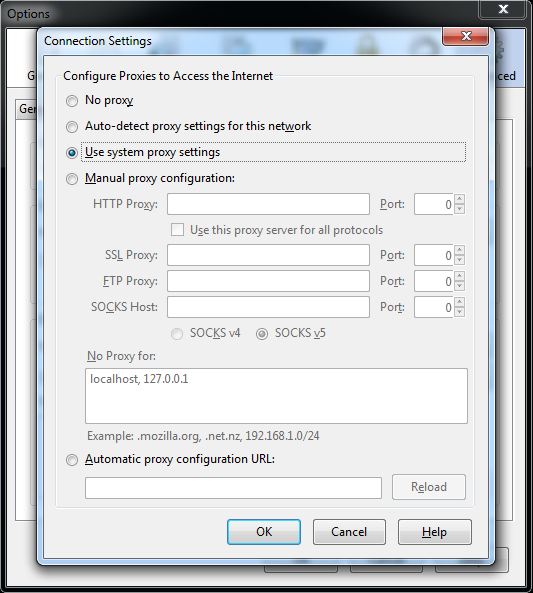
    Now choose Network then Settings. You should see a window like this:


    putty-save-session firefox-settings-for-remote-browsing


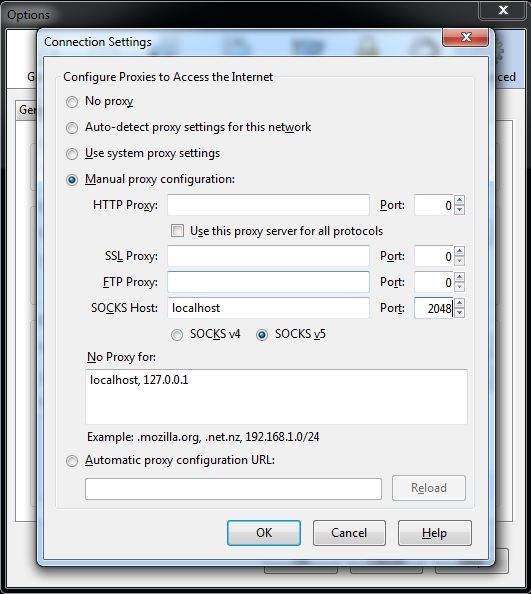
    Now choose “Manual proxy configuration” and enter localhost in SOCKS Host, and 2048 in the corresponding Port field like so:


    firefox-socks-settings-for-remote-browsing


    Click OK then again on the previous screen, open your Putty connection and the next URL you enter should be tunneled through to your remote server! To undo this, simply go into Firefox and put the above screen back to “Use system proxy settings”.


  • Windows 7 – Stopping a Wacom pen from right-clicking on a long press (aka press and hold)


    This is a personal bugbear which I encounter every time I reinstall a W7 OS. The problem is that when you hold the pen down – like you might when you’re trying to highlight text – Windows has a default setting of assuming that you wish to right click, which interrupts the selection you were making in an extremely irritating fashion. This isn’t a setting in the Wacom tablet settings, either, so it can be a little hard to find. The solution is in the Windows “Pen and Touch” settings (hit the Start button and then type “Pen” and you should see it as one of the options).


    Pen Options -> Press and hold -> Settings -> untick “Enable press and hold for right-clicking” -> Click OK -> Click Apply.


    While this may be a handy option for pens which don’t have a right-click button it really only serves to be a hindrance for a lot of Wacom users, it seems.

  • ZFS: Renaming a zpool


    If you’ve imported a pool from another system and want to change the name or have just changed your mind, this is actually quite straightforward to do. Run the following (as root):

    zpool export [poolname]

    As an example, for a pool named tank which we wish to rename notankshere:

    zpool export tank

    Then run:

    zpool import [poolname] [newpoolname]

    e.g.:

    zpool import tank notankshere


    The pool will be imported as “notankshere” instead.

  • How to kill a process after a set period of time


    Knowing how to limit how long a process will run for is quite useful, particularly when you have daily backup scripts and the like which may at times run more than 24 hours; having multiple processes attempting to synchronize the same files can waste time, bandwidth and CPU power needlessly. The command we will use here is timeout. Ubuntu Server should have this pre-installed. It is used so:


    timeout [no. of seconds] [command]


    e.g.


    timeout 10 rsync /home/user/files/ /backups/user/files/


    would run the above rsync command but kill it after 10 seconds.


    This can be particularly useful with your daily scripts; simply set the timeout to be a few minutes less than 24 hours and you should hopefully avoid them running over each other. For reference there are 3600 seconds in an hour and 86400 seconds in 24 hours; setting a process to timeout after 86000 seconds would result in it running for 23 hours, 56 minutes and 20 seconds.