Category: Terminal

  • How do you check website links and jpgs etc. recursively?

    LinkChecker is a great way of doing this;


    http://wummel.github.io/linkchecker/


    Other people’s sites may have robots.txt files that prevent you from using this tool on their sites but it’s darn handy for pulling up broken links on your own sites. This is a valid alternative to the Integrity tool on Mac if you’re comfortable with the command line and piping the output to a CSV file etc.


  • How to kill a KVM virtual machine in Promox via the command line or terminal


    Sometimes a Proxmox KVM VM will stop responding to the GUI’s attempts to shut it down; fortunately it’s easy to shut it down from the command line. Make note of the VM ID (next to the name of the VM in the left pane of the Proxmox GUI), log into the server via SSH as root and run:


    qm stop [vmid]


    e.g.:


    qm stop 124


    Check back in the GUI a few seconds later and you should see that the KVM has stopped.

  • Awk: Remove everything after the first word in each line


    Another awk question. How to remove everything after the first word in each line? E.g., if we wanted to remove everything but the names in this input (FILENAME.txt):


    Anna 123 09123 Main Street

    Bob 109 09800 Smith Street

    Joe 0981 123123 King Street


    We can use awk like so:


    awk ‘{ print $1 }’


    e.g.:


    cat FILENAME.txt | awk ‘{ print $1 }’


    which will print:


    Anna

    Bob

    Joe


    Short and sweet.

  • Awk: Remove first line of file


    Short and sweet – when piping data through awk, how do we remove the first line of the input?


    awk ‘{if (NR!=1) {print}}’


    e.g.


    cat FILENAME.txt | awk ‘{if (NR!=1) {print}}’


    Done!

  • ZFS: Adding a new mirror to an existing ZFS pool


    Mirrored vdevs are great for performance and it is quite straight-forward to add a mirrored vdev to an existing pool (presumably one with one or more similar vdevs already):


    zpool add [poolname] mirror [device01] [device02] [device03]


    If it’s a two-way mirror you will only have two devices in the above. An example for ZFS on Ubuntu with a pool named seleucus and two SSDs could look like:


    zpool add seleucus mirror ata-SAMSUNG_SSD_830_Series_S0XYNEAC705640 ata-M4-CT128M4SSD2_000000001221090B7BF9


    As always, it’s good practice to use the device name found in /dev/disk/by-id/ rather than the sda, sdb, sdc etc. names as the latter can change – the former do not.

  • Ubuntu: How to delete a user


    In Ubuntu 12.04 and 12.10, to delete an additional user you have created, use the following:


    sudo deluser [username]


    By example, if we wanted to delete a user we created called “test”, we would run:


    sudo deluser test


    Which gives:


    Removing user `test’ …

    Warning: group `test’ has no more members.

    Done.


    Be careful with this – don’t delete your admin account 🙂

  • Ubuntu: How to add a existing user to an existing group


    To add an existing user to a second group, use the following command:


    sudo usermod -a -G [group] [user]


    e.g.:


    sudo usermod -a -G geeks bob


    This will add the user bob to the group geeks.

  • How to remove/delete old or unused kernels in Ubuntu


    If you have upgraded your kernel you will have found that Ubuntu keeps the older ones around, which can be handy if something breaks in the newer kernel and you have to boot from your old system. Over time, however, these can add up in terms of the amount of space consumed – at around 150MB per kernel you could easily find yourself with over a GB of old kernels if you’ve upgraded enough times. In this example the system we are using is Ubuntu 12.0.4.2. If you’re using Ubuntu Desktop, open up a terminal window – if you’re using Ubuntu Server, log in as usual and run:


    uname -r

    to see which kernel you are currently running. Make sure not to delete this one. Now, to see a list of the installed kernels, we run:


    dpkg –list | grep linux-image

    This command lists the installed packages and filters the list to include only those which have “linux-image” in them, which should only be your kernels. Your list should look something along the lines of:


    ii  linux-image-2.6.32-33-server 2.6.32-33.72     Linux kernel image for version 2.6.32 on x86_64
    ii  linux-image-3.2.0-35-generic 3.2.0-35.55      Linux kernel image for version 3.2.0 on 64 bit x86 SMP
    ii  linux-image-3.2.0-38-generic 3.2.0-38.61      Linux kernel image for version 3.2.0 on 64 bit x86 SMP
    ii  linux-image-server           3.2.0.38.46      Linux kernel image on Server Equipment.


    To remove a kernel, run the following:


    sudo apt-get purge [kernel]


    Using the above list, say we want to get rid of 3.2.0-35. In that case the command would be:


    sudo apt-get purge linux-image-3.2.0-35-generic


    Once you have removed your unwanted kernels run:


    sudo update-grub2


    This will update the boot menu accordingly.

  • How to see individual CPU core loads in Ubuntu


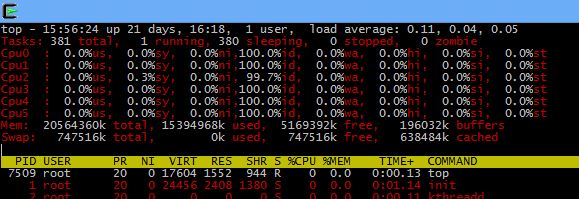
    This is an interesting one – if you have the need to monitor your CPU usage individually across cores it’s actually quite easy with the top command. Simply run top and hit “1” – your output will go from:


    topSingleView

    to:


    topMultiCore

    In this case the server is a hexcore (0-5 cores shown, 6 in total) and we can clearly see the loads across each of them. To get colours – it can make top easier to read – hit Z.


    This can be quite handy for monitoring your CPU usage in more detail than basic load averages.

  • How to kill a process after a set period of time


    Knowing how to limit how long a process will run for is quite useful, particularly when you have daily backup scripts and the like which may at times run more than 24 hours; having multiple processes attempting to synchronize the same files can waste time, bandwidth and CPU power needlessly. The command we will use here is timeout. Ubuntu Server should have this pre-installed. It is used so:


    timeout [no. of seconds] [command]


    e.g.


    timeout 10 rsync /home/user/files/ /backups/user/files/


    would run the above rsync command but kill it after 10 seconds.


    This can be particularly useful with your daily scripts; simply set the timeout to be a few minutes less than 24 hours and you should hopefully avoid them running over each other. For reference there are 3600 seconds in an hour and 86400 seconds in 24 hours; setting a process to timeout after 86000 seconds would result in it running for 23 hours, 56 minutes and 20 seconds.