Tag: terminal

  • How to kill a KVM virtual machine in Promox via the command line or terminal


    Sometimes a Proxmox KVM VM will stop responding to the GUI’s attempts to shut it down; fortunately it’s easy to shut it down from the command line. Make note of the VM ID (next to the name of the VM in the left pane of the Proxmox GUI), log into the server via SSH as root and run:


    qm stop [vmid]


    e.g.:


    qm stop 124


    Check back in the GUI a few seconds later and you should see that the KVM has stopped.

  • Awk: Remove everything after the first word in each line


    Another awk question. How to remove everything after the first word in each line? E.g., if we wanted to remove everything but the names in this input (FILENAME.txt):


    Anna 123 09123 Main Street

    Bob 109 09800 Smith Street

    Joe 0981 123123 King Street


    We can use awk like so:


    awk ‘{ print $1 }’


    e.g.:


    cat FILENAME.txt | awk ‘{ print $1 }’


    which will print:


    Anna

    Bob

    Joe


    Short and sweet.

  • Awk: Remove first line of file


    Short and sweet – when piping data through awk, how do we remove the first line of the input?


    awk ‘{if (NR!=1) {print}}’


    e.g.


    cat FILENAME.txt | awk ‘{if (NR!=1) {print}}’


    Done!

  • How to see individual CPU core loads in Ubuntu


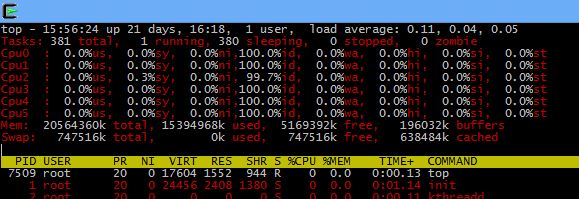
    This is an interesting one – if you have the need to monitor your CPU usage individually across cores it’s actually quite easy with the top command. Simply run top and hit “1” – your output will go from:


    topSingleView

    to:


    topMultiCore

    In this case the server is a hexcore (0-5 cores shown, 6 in total) and we can clearly see the loads across each of them. To get colours – it can make top easier to read – hit Z.


    This can be quite handy for monitoring your CPU usage in more detail than basic load averages.

  • How to kill a process after a set period of time


    Knowing how to limit how long a process will run for is quite useful, particularly when you have daily backup scripts and the like which may at times run more than 24 hours; having multiple processes attempting to synchronize the same files can waste time, bandwidth and CPU power needlessly. The command we will use here is timeout. Ubuntu Server should have this pre-installed. It is used so:


    timeout [no. of seconds] [command]


    e.g.


    timeout 10 rsync /home/user/files/ /backups/user/files/


    would run the above rsync command but kill it after 10 seconds.


    This can be particularly useful with your daily scripts; simply set the timeout to be a few minutes less than 24 hours and you should hopefully avoid them running over each other. For reference there are 3600 seconds in an hour and 86400 seconds in 24 hours; setting a process to timeout after 86000 seconds would result in it running for 23 hours, 56 minutes and 20 seconds.

  • How to easily find the full path of a command in Ubuntu


    If you’re writing scripts or making cron jobs you will need to know the full path of the commands you’re using; rather than just being able to use “ls” you would have to use “/bin/ls” instead. You could use the find command here but there’s a quicker and more elegant way: which. Use it like so:


    which ls


    will return:


    /bin/ls


    Not everything will be in /bin, e.g.:


    which timeout


    will likely return:


    /usr/bin/timeout


    Simple but it will make your life quite a bit easier when writing scripts, particularly with new commands or command which you don’t use often.

  • Ubuntu: Clear terminal screen


    Sometimes you may wish to clear the terminal window, whether it be to hide what you’ve just done, clear some irrelevant/distracting output or any other reason. The best command to do this is simple:


    reset


    This completely clears the output shown in your terminal window but doesn’t log you out. If you want to keep your output in the buffer (i.e. so you can scroll back up to it) but still clear the terminal you can see you can use the following key combination:


    ctrl+L


    This pushes the output up above your prompt and puts the prompt at the top of your window.


  • How to exclude results from grep


    Sometimes you may wish to further filter grep output, such as in the following situation:


    # zfs get all | grep compressratio

    backup01         compressratio         1.23x                  –
    backup01         refcompressratio      1.00x                  –
    backup01/data    compressratio         1.50x                  –
    backup01/data    refcompressratio      1.50x                  –
    backup01/photos  compressratio         1.05x                  –
    backup01/photos  refcompressratio      1.05x                  –

    Here we only really want to see the compressratio results, not the refcompressratio. We can pipe the grep output to another grep command, this time inverting the results with the -v switch.


    # zfs get all | grep compressratio | grep -v refcompressratio

    backup01         compressratio         1.21x                  –
    backup01/data    compressratio         1.50x                  –
    backup01/photos  compressratio         1.05x                  –

    This excludes any line containing refcompressratio, making the results easier to read. This is particularly helpful when you have a large number of results from grep.

  • Ubuntu: How to view results of “ls” one page at a time

    If you’re listing the contents of a directory using the “ls -l” command in a terminal window you may find that the number of results cause pages of text to fly past your screen, leaving you with only the last page to look at. If you aren’t using a terminal which you can scroll back through this can be rather annoying; fortunately, there’s an easy fix.


    In a nutshell you can direct the output of the ls command to another command – less – which allows you to view the results one page at a time. We do this using a pipe: the | symbol.


    ls -l | less


    The less command shows you one screen at a time; to see the next screen, press the spacebar. If you would like less at once, you can see the next single line using the return key. You can go back a screen by pressing the “b” key or half a screen with the “u” key. There are plenty of other useful commands within less – you can see the manual for it by typing:


    man less


    You can navigate the manual in the same way – spacebar for another screen, u and b to move back up!