Author: sotech

  • Monitoring network usage on Ubuntu


    If you want to see how much traffic is passing through your network port there’s a handy tool called vnstat which will tally the amount of data passing through. You can install it with:


    sudo apt-get install vnstat


    It will usually add the databases and network ports automatically like so:


    vnstat-0


    If it doesn’t and gives you an error you can create the database(s) with:


    sudo vnstat -u -i eth0


    If you have multiple network cards/ports you can add those in, too:


    vnstat -u -i eth1

    vnstat -u -i eth2

    …etc


    If it couldn’t create the databases you can start it with:


    sudo /etc/init.d/vnstat start


    If you need to change the maximum bandwidth from 100Mb you can edit the file:


    /etc/vnstat.conf


    Scroll down until you see the following:


    # maximum bandwidth (Mbit) for all interfaces, 0 = disable feature
    # (unless interface specific limit is given)
    MaxBandwidth 100


    and make MaxBandwidth the figure you require (e.g. 1000). If you make a change restart vnstat with:


    /etc/init.d/vnstat restart


    You can now see how much traffic has come through the NIC since vnstat started recording – at first it probably won’t be much (if any), but as it adds up you can check it with:


    vnstat


    The output should look like:


    vnstat-01


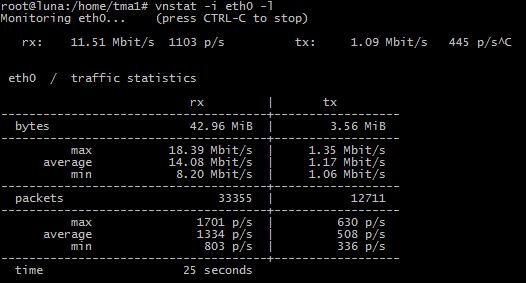
    You can watch how much traffic is flowing through in real-time by running:


    vnstat -i eth0 -l


    This will give you a screen showing you the current traffic:


    vnstat-02


    You can end this with CTRL+C, which shows you a summary screen:


    vnstat-03


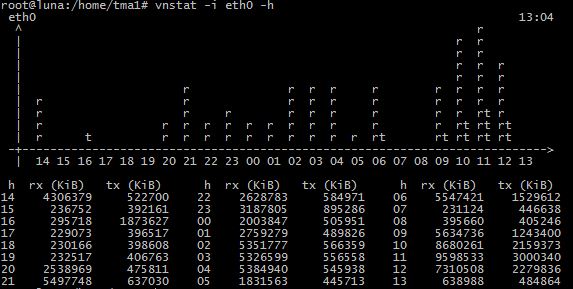
    You can get an hourly summary with:


    vnstat -i eth0 -h


    vnstat-04 vnstat-05


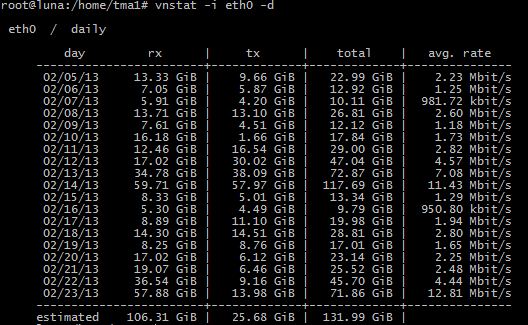
    Daily summary with:


    vnstat -i eth0 -d


    vnstat-04

    Monthly summary with:


    vnstat -i eth0 -m


    vnstat-06


    This is a really handy way of keeping track of your network traffic – whether it’s out of curiosity, wanting to know how much stress your network is under or looking for a bottleneck this can be quite a valuable tool.

  • Ubiquiti Edge Router Lite default login and password


    Oh, and as a follow-up to yesterday – the default login and password for a Ubiquiti Edge Router Lite is:


    ubnt

    ubnt


    Hope that helps – I know I’m guilty of a quick google for the login rather than opening a manual!

  • Ubiquiti Edge Router Lite default IP address


    I know someone is going to ask me this in the future so I’m making this post now – the default IP address for the Ubiquiti Edge Router Lite is:


    192.168.1.1


    For those of us who use 10.1.1.x etc. you’ll have to put a computer onto the 192.168.1.x range temporarily to change the router to suit your network.

  • TP-Link TL-WA701ND review


    Wireless access points can be really handy devices – they can solve a number of problems such as connecting a PC/device without a wireless card to the network, creating a network bridge or extending your network. This TP-link, at around $30, offers quite a bit of potential for not a lot of money.
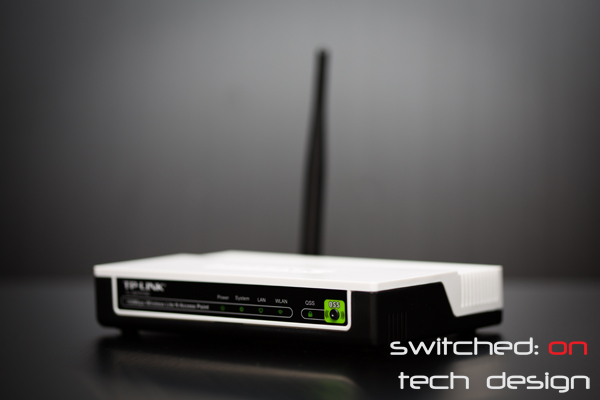


    tp-link-wireless-access-point


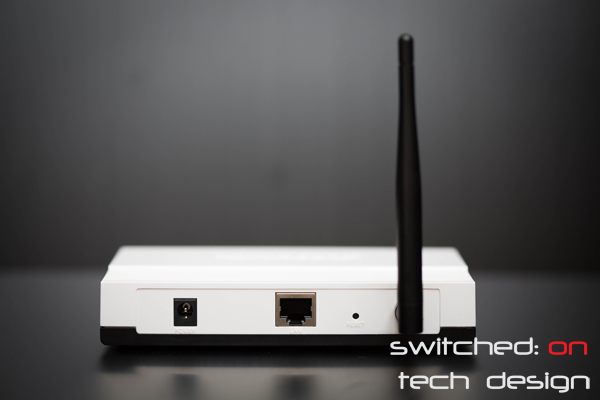
    Physically it’s quite a small box with a single LAN port in the back:

    tp-link-rear


    You can also see the power point on the left and the recessed reset button on the right. There’s a single antenna which can be bent into a variety of positions. It does come with a Power over Ethernet adapter, though, which is a nice inclusion for the price – this means that you aren’t limited to placing this device near a power point as you can feed power into the Ethernet line going into it instead!
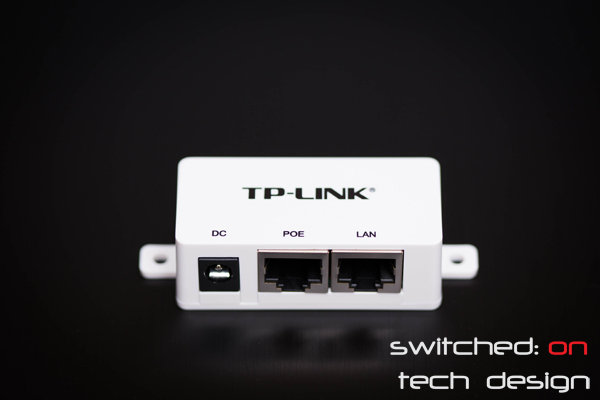


    tp-link-poe-adapter


    It uses the regular power brick so nothing else is required to get POE going. On first boot the TL-WA701ND has the default IP address of 192.168.1.254, so if you’re using a different IP address range (e.g. 10.1.1.x) you’ll have to change a device to be able to log in and change the static IP of the device to match your own network. The default login is admin/admin – don’t forget to change this! Once you log in you should see the following screen:
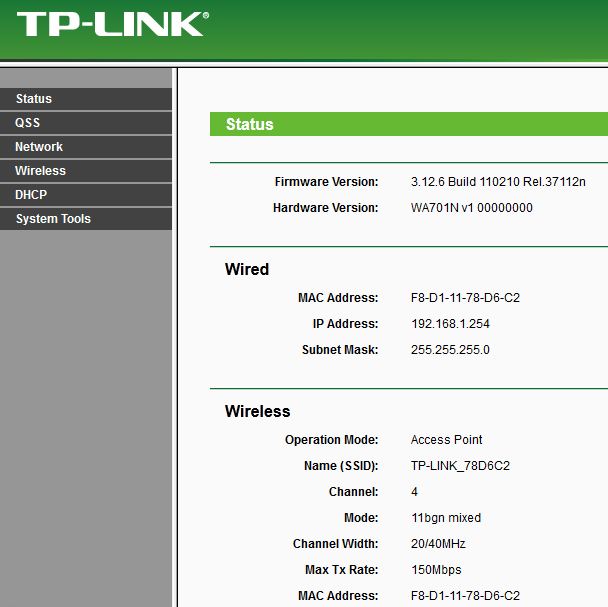


    tpLink-01


    The TL-WA701ND defaults to Access Point mode, as you can see. If you need to you can jump straight to the Network menu to change the IP range:
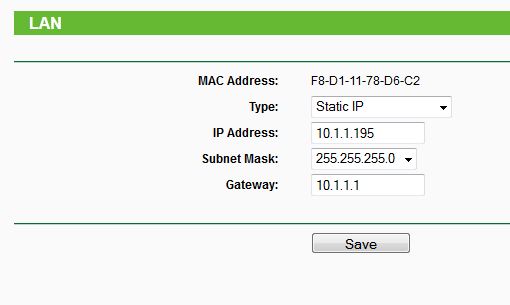


    tp-link-lan-page-05


    Replace 10.1.1.x with whatever IP address you require. Click save, reboot the router, put your computer back to your usual IP address range and log in again:
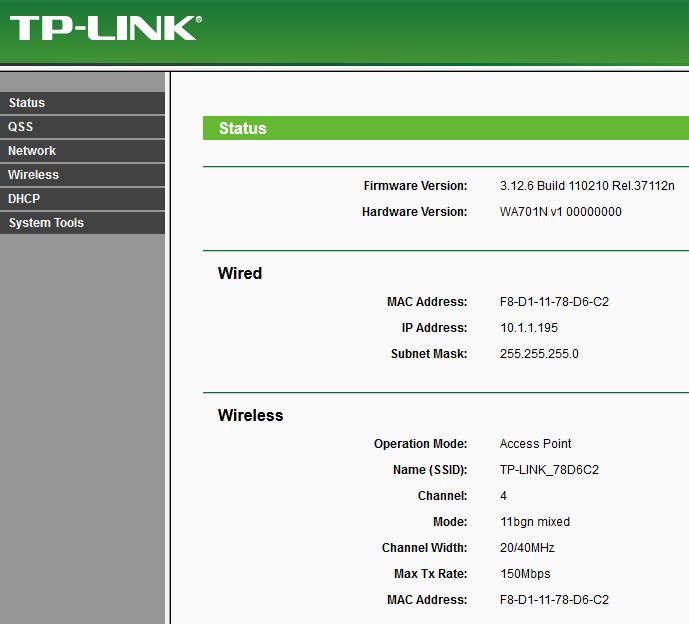


    tp-link-02


    Easy done. On the same screen at the bottom you can see traffic statistics:


    tp-link-03


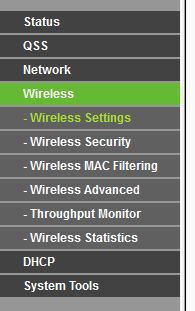
    Now on to the Wireless menu:


    tp-link-wireless-menu-06

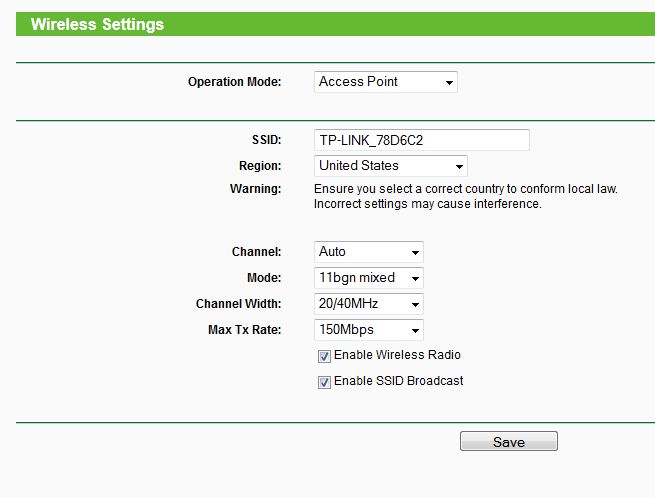
    The Wireless settings default to the following:


    tp-link-wireless-settings-07


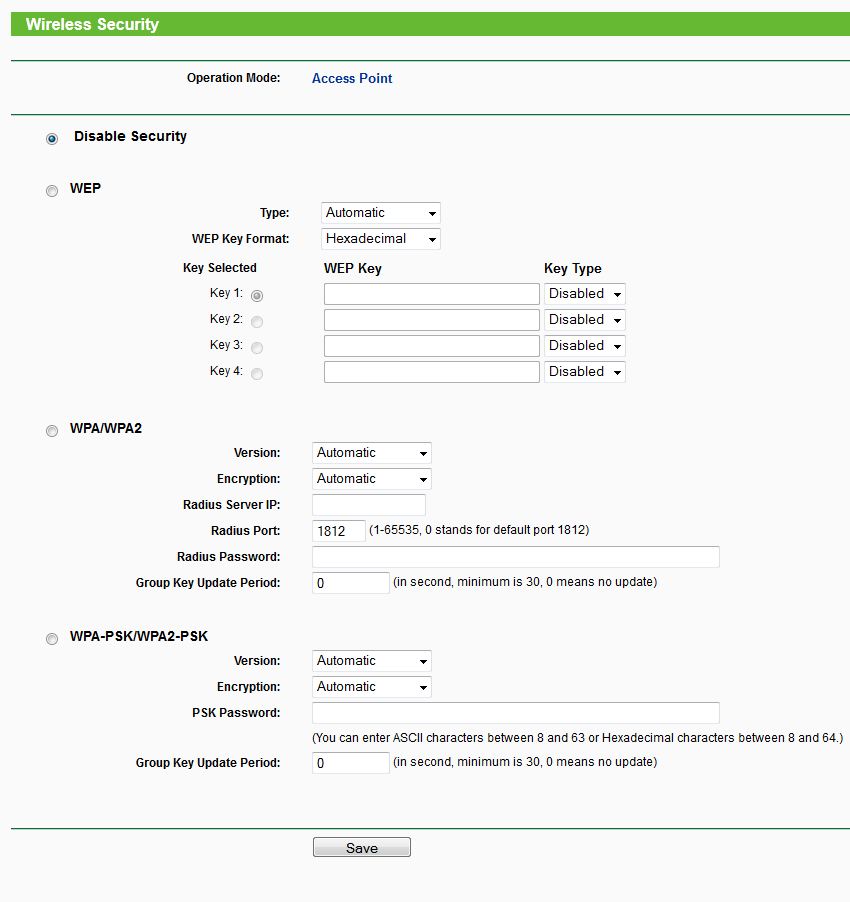
    Your choices of Mode are Access Point, Multi-SSID, Client, Repeater, Universal Repeater and Bridge with AP – quite a flexible range of options! The other important page for setting this device up is the Wireless Security page:


    tp-link-wireless-security-08


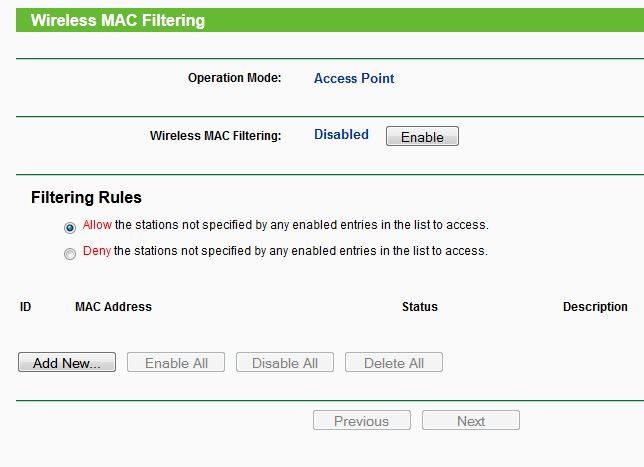
    While I certainly wouldn’t encourage anyone to use WEP when WPA2 is available it can sometimes be handy for non-mission-critical situations where you have to connect devices which don’t support WPA. If your devices do support WPA, though, it’s a much more secure protocol and is the better choice. Also on the topic of security, you can filter access by MAC address:


    tp-link-wireless-mac-filtering-09


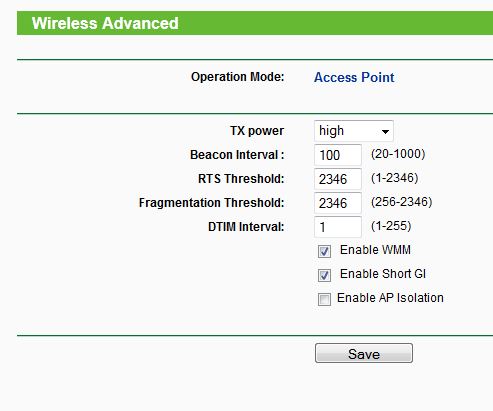
    If you’re looking for more control over the wireless aspect of the device, there’s an advanced menu for Wireless settings:


    tp-link-wireless-access-point-10


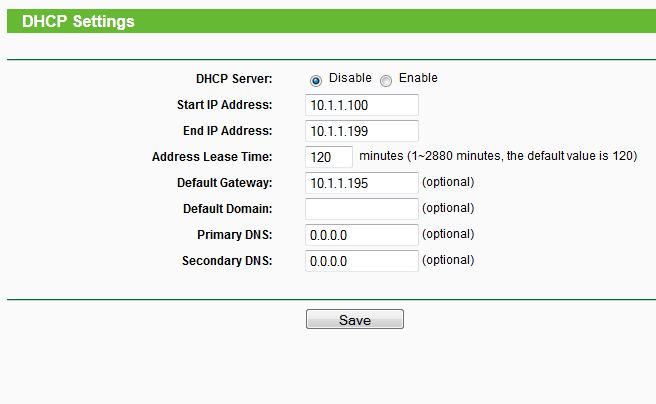
    Most users won’t have to touch this, however. Moving on down the menu, we can see our DHCP settings:


    tp-link-dhcp-11


    It picks reasonably sensible ranges by default. The System Tools menu is next, and contains the following:
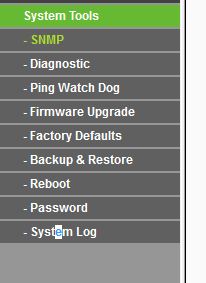


    tp-link-system-tools-12


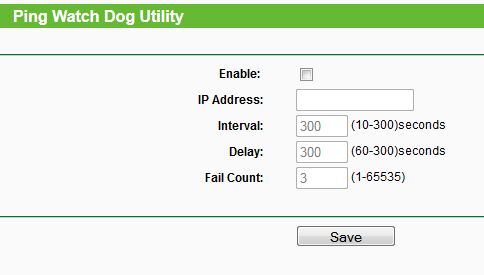
    SNMP is a nice inclusion for home enthusiasts or businesses who want/need to keep track of their devices. Another interesting function is the Ping Watch Dog Utility:


    tp-link-ping-watchdog-14


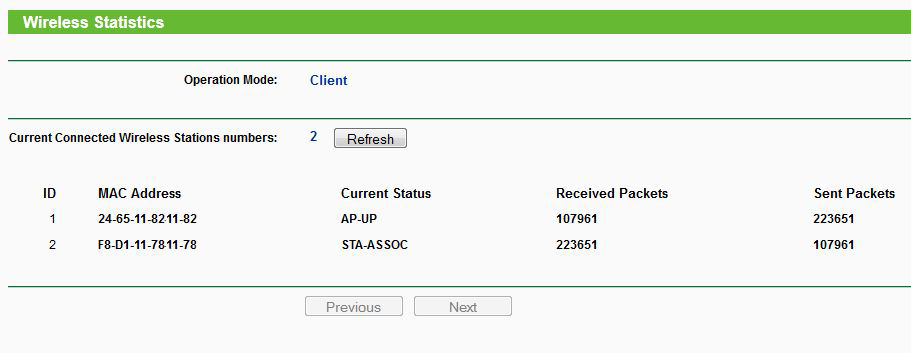
    I doubt most people would use it but someone may find it useful! Probably more useful is the Wireless Statistics, which shows each connected device’s usage:


    tp-link-wireless-statistics-15


    So, that’s what the OS has to offer – so how does it perform? For this test we used iperf on a laptop attached to the TL-WA701ND in Client mode, simulating a device which lacks a wireless card being added to the wireless network. The wireless network was broadcasted from a Fritzbox 7390 through one wall about 5 meters/15 feet away. The laptop is a current-generation HP Folio 13 Ultrabook. The test was ran three times and the average result taken. So how did it go?
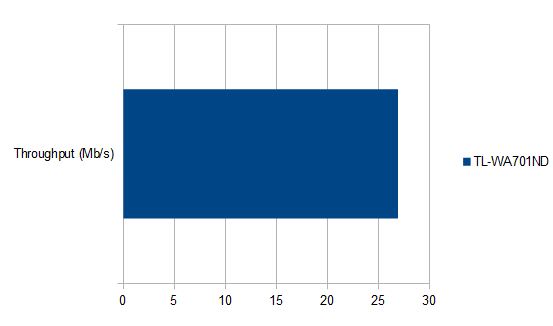


    tl-wa701ND-throughput

    26.9Mb/s. That may not sound like a lot when compared to the theoretical max of 150Mb/s, but now look at the graph when we include the speeds we reached when using the laptop’s own Intel Wireless N card:
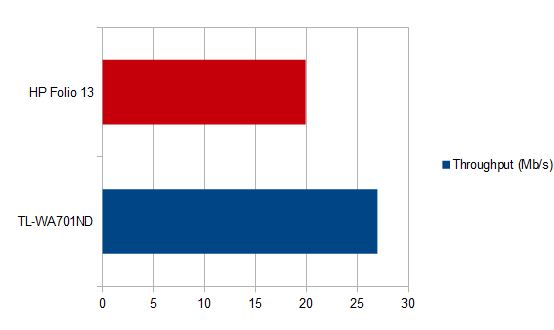


    tp-link-vs-laptop

    The laptop only achieved 19.9Mb/s in the same situation – meaning that the TL-WA701ND outperformed it by around 35%. For the princely sum of around $30, you can’t really complain about performance like that. Definitely more than enough for web browsing/Youtube and light file sharing duties, and having power-over-ethernet available out of the box is a useful addition that increases the flexibility in terms of placement. If you need an inexpensive way of getting devices onto your wireless network, this little device is definitely worth considering if you don’t need a lot of throughput.

  • Ubiquiti EdgeRouter Lite Review: Part 1


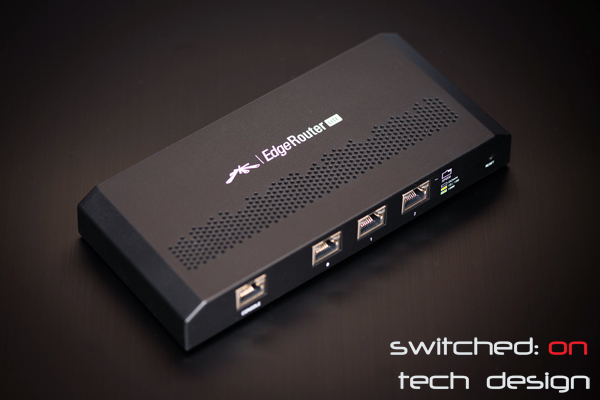
    The EdgeRouter Lite is Ubiquiti’s latest router with some pretty high-end features at an entry-level price. The tagline is “The world’s first sub-$100, one million-packets-per-second router” – US dollars, of course. It retails for around $140 Australian.


    ubiquiti-edge-router-lite


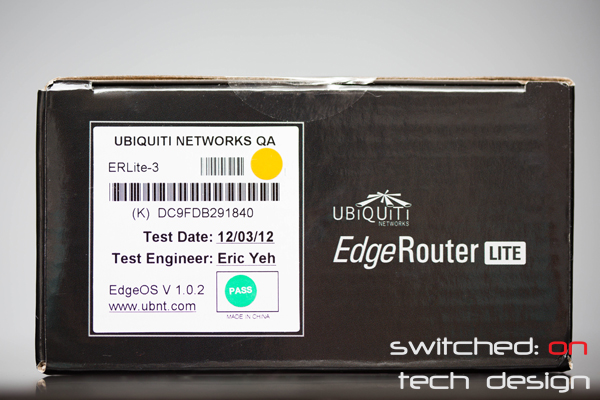
    The first part of the review is going to focus on the actual unit itself, the second on the software and performance. The box itself is reasonably innocuous – matte black plastic with ventilation holes top and bottom. It is quite light in the hand – under 300 grams – and around 20x9x3cm. One interesting thing on the box is the testing date is clearly marked on the top:


    ubiquiti-edge-router-lite-box


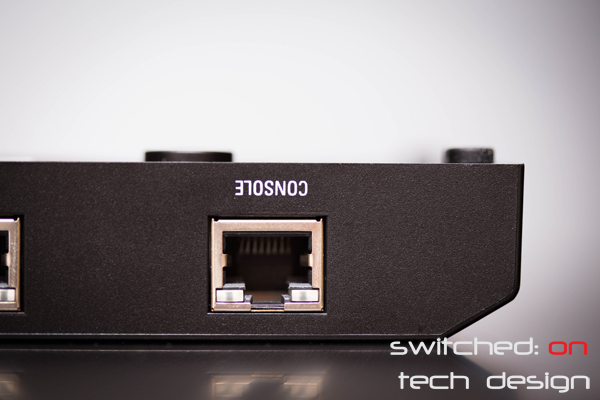
    Having the engineer’s name is a nice marketing touch – giving the impression that someone has personally tested this unit. This might be the case with every other product out there but few draw attention to it. Inside the box itself is the unit itself, a charge cable, a quick setup guide, some wall-mount screws and… that’s it. While there is a console port on the back Ubiquiti don’t provide you with a cable with which to access it – not surprising given the price point. Looking at the unit itself again:
     

    ubiquiti-edge-router-lite-front


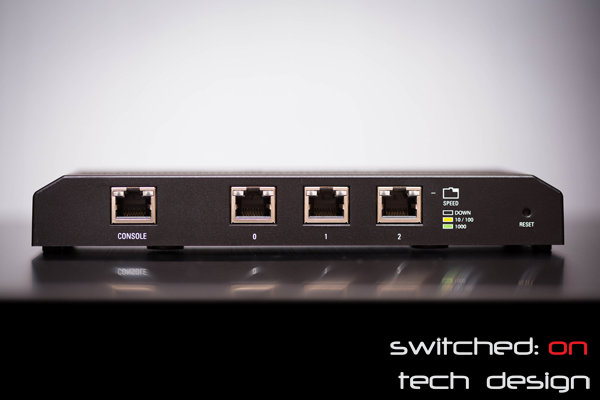
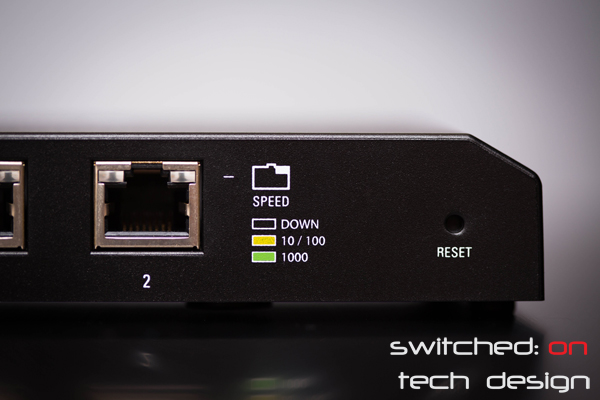
    On the left there is a clearly marked console port, followed by the ethernet ports 0, 1 and 2. It’s nice that they’re clearly labelled, and the speed indicator colours are also quite clearly marked. On the far right hand side we see the reset button:


    ubiquiti-edge-router-lite-info-and-reset-button


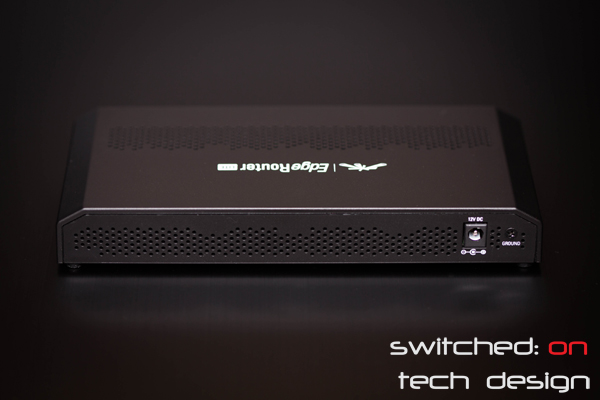
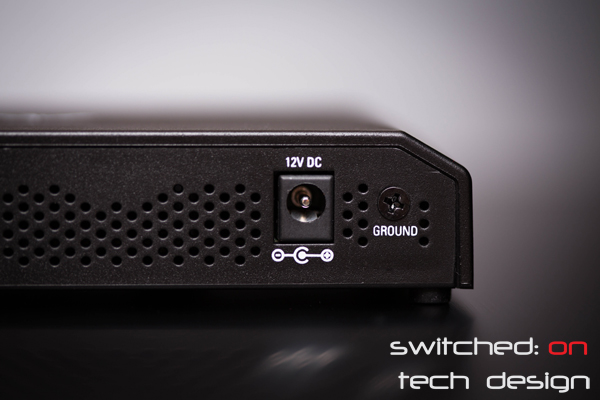
    Looking at the other side we’re greeted by, well, not much. Some faux ventilation holes, the power connector and a ground screw.


    ubiquiti-edge-router-lite-rear

    ubiquiti-edge-router-lite-power-and-ground


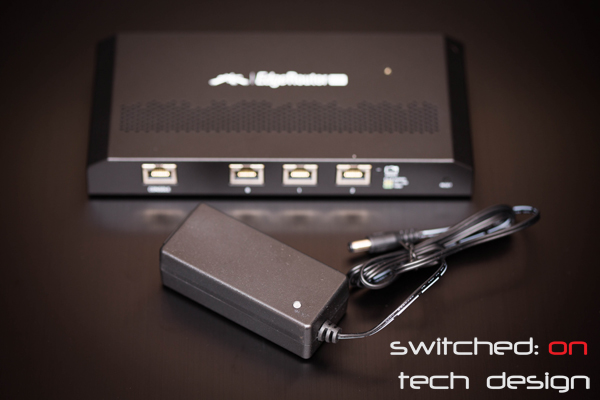
    Speaking of power, the power brick is a mere 1A and is reasonably small:


    ubiquiti-edge-router-lite-power-brick


    The brick uses a cloverleaf connector.


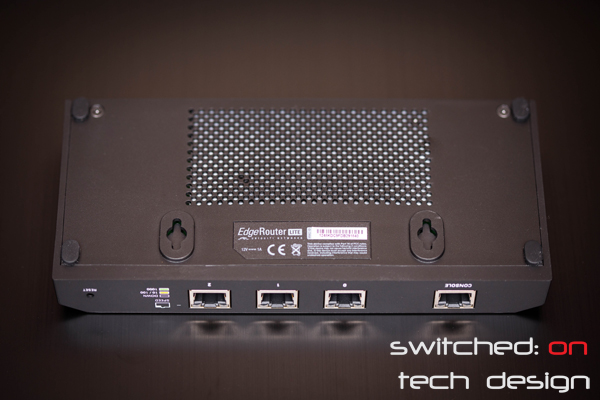
    ubiquiti-edge-router-lite-base


    On the underside we have the wall mounting holes, four rubber feet and some ventilation holes. The feet give the chassis a few mm of breathing space:


    ubiquiti-edge-router-lite-feet


    That’s it for the outside of the box – stay tuned for Part 2, where we look at the OS and what this little box can do!

  • Setting up one browser remotely, one locally


    As a follow-up to the Firefox and Internet Explorer remote browsing articles we were asked whether you could set IE up for remote browsing and Firefox for local browsing. This certainly can be done – set up your tunnel in Internet Explorer then open up Firefox and go to:


    Tools -> Options -> Advanced -> Network -> Settings -> select No Proxy


    Firefox should now work locally again.

  • Using an SSH tunnel with Internet Explorer


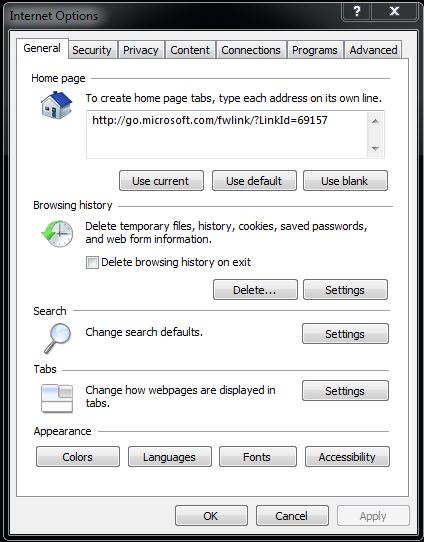
    As a follow-up to the previous article on how to browse the web via an SSH tunnel in Firefox we’ve been asked to show how to do the same with Internet Explorer. The Putty set-up remains the same; once that’s complete, open Internet Explorer (we are using IE 9) and go to Tools -> Internet Options (you may have to hit Alt to bring up the top menu):

    remote-access-ie-01

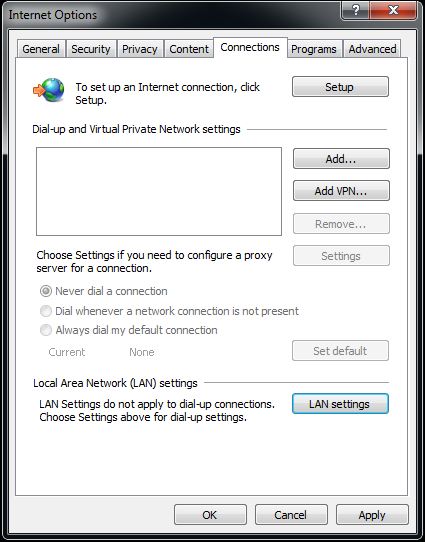
    Go to Settings:

    remote-access-ie-02

    Choose LAN settings:


    remote-access-ie-03

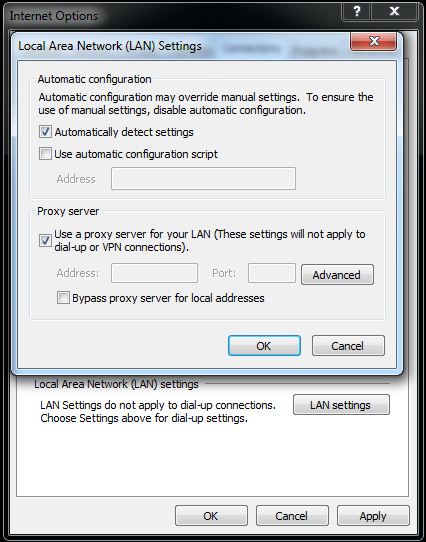
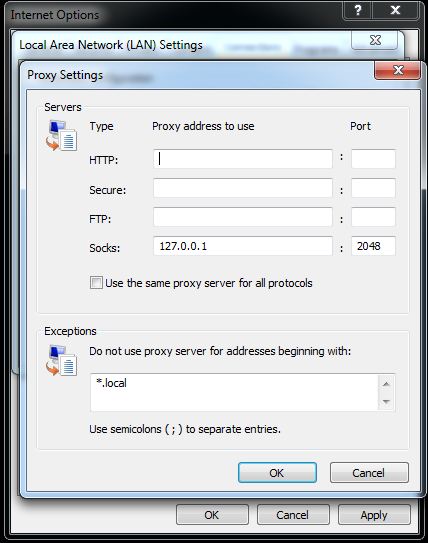
    Tick “Use proxy server for your LAN” and click Advanced:


    remote-access-ie-04

    Make sure the top four lines are blank in all fields except for the SOCKS port – here put:


    127.0.0.1


    and the port we used in Putty:


    2048


    Make sure the “Use the same proxy server for all protocols” box is unticked.


    Hit OK -> OK -> Apply -> OK, open up your SSH tunnel in Putty and you should be ready to browse the internet remotely!

  • MythTV backend DVB adapter error: ERROR_OPEN


    If you see the above error when you’re trying to set up your DVB tuner card one cause is that MythTV can’t get access to the tuner card. This can be because there’s another application installed which has access to it, e.g. something like TVHeadend. On XBMCBuntu you can uninstall TVHeadend by running the following:


    apt-get remove tvheadend

    apt-get purge tvheadend


    …then retry the setup. If that was the problem it should pick the tuner up now without issue, showing the tuner name in place of ERROR_OPEN.

  • Browsing the web through a SSH tunnel with Firefox and Putty (Windows)


    If you have the ability to SSH into a remote machine you also have the ability to direct your web browser’s traffic through SSH to that machine. This can be quite handy for browsing the (remote) local network without opening a HTTP port on the firewall.


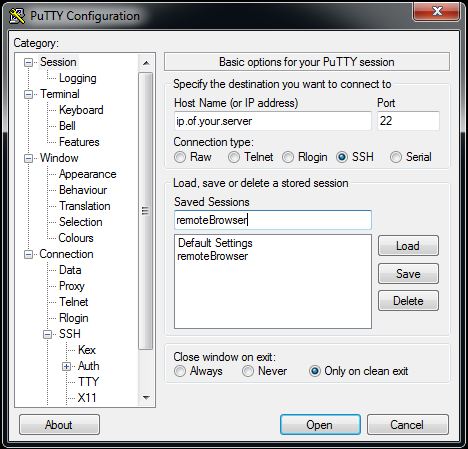
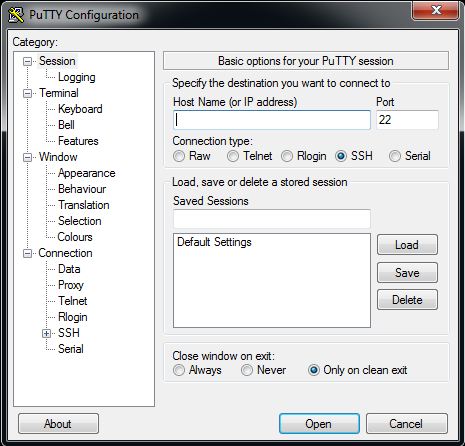
    First, install Putty and Firefox. Putty can be found here and Firefox here. If you’re not sure which file to download for Putty, just go for putty.exe. Once you’ve downloaded Putty, open it and you should see a screen like this:


    putty-01


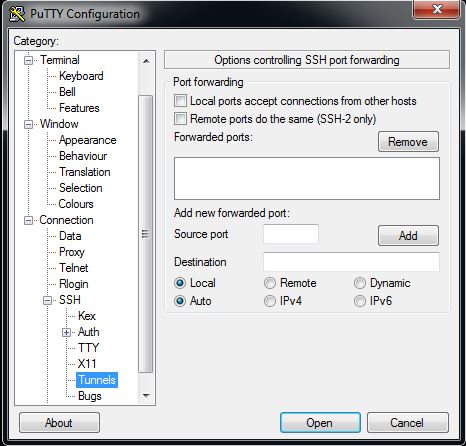
    Enter in the remote computer’s IP address and SSH port number (usually 22 unless you changed it) and test the connection to make sure you can log in. If that works, disconnect and go to Connection -> SSH -> Tunnels like so:


    putty-connection-ssh-tunnels


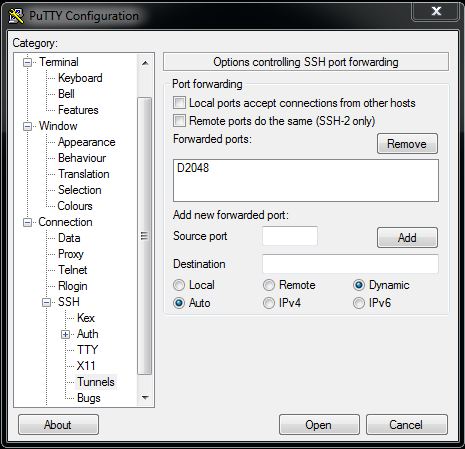
    then change the selection from Local to Dynamic. After that, enter 2048 into the “Source port” field and click Add.  Your screen should now look like:

    putty-source-port


    Note the D in front of the source port number – that should be there.


    Scroll back up on the left until you get back to the original Session window. Check the IP address and port numbers and enter a name in the “Saved Sessions” box, then click Save. Now you can load these settings again next time you open Putty.


    putty-save-session


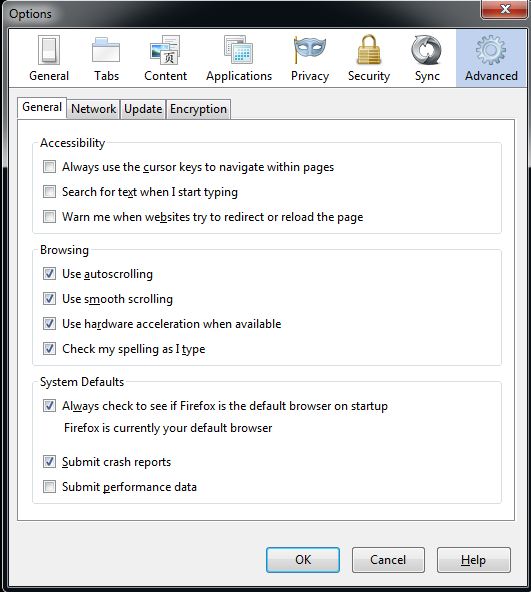
    The version of Firefox we’re using for today’s example is 18.0.2. Go to Tools -> Options -> Advanced (you may have to hit Alt to bring up the Tools menu at the top):


    firefox-options-for-remote-browsing


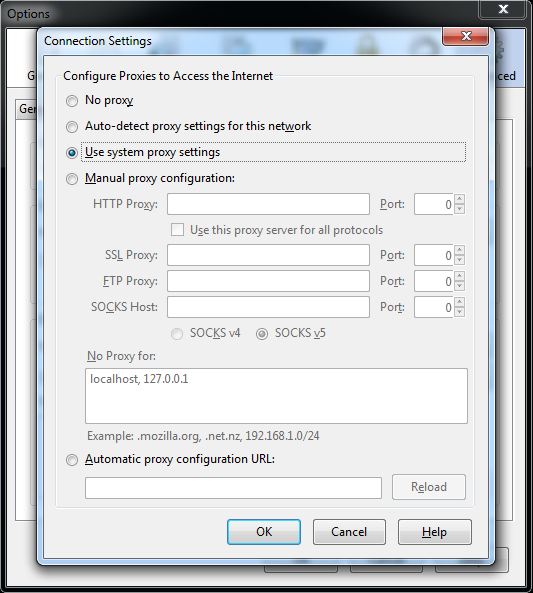
    Now choose Network then Settings. You should see a window like this:


    putty-save-session firefox-settings-for-remote-browsing


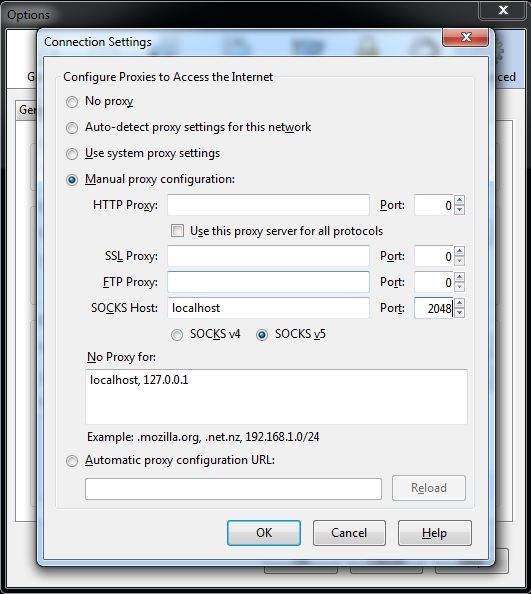
    Now choose “Manual proxy configuration” and enter localhost in SOCKS Host, and 2048 in the corresponding Port field like so:


    firefox-socks-settings-for-remote-browsing


    Click OK then again on the previous screen, open your Putty connection and the next URL you enter should be tunneled through to your remote server! To undo this, simply go into Firefox and put the above screen back to “Use system proxy settings”.


  • Windows 7 – Stopping a Wacom pen from right-clicking on a long press (aka press and hold)


    This is a personal bugbear which I encounter every time I reinstall a W7 OS. The problem is that when you hold the pen down – like you might when you’re trying to highlight text – Windows has a default setting of assuming that you wish to right click, which interrupts the selection you were making in an extremely irritating fashion. This isn’t a setting in the Wacom tablet settings, either, so it can be a little hard to find. The solution is in the Windows “Pen and Touch” settings (hit the Start button and then type “Pen” and you should see it as one of the options).


    Pen Options -> Press and hold -> Settings -> untick “Enable press and hold for right-clicking” -> Click OK -> Click Apply.


    While this may be a handy option for pens which don’t have a right-click button it really only serves to be a hindrance for a lot of Wacom users, it seems.