Author: sotech

  • How to caption an image – HTML5

    How do you caption an image in HTML? One way is using figure tags.

    Without them, you might use the following:


    <img src=”image.jpg” align=”center” />


    …to create this:

    logo-open-zfs

    So, you have an image using the above. How do you make it into an image with a caption?

    <figure>

    <img src=”image.jpg” align=”center”/>

    <figcaption><center>Caption goes here</center></figcaption>

    </figure>


    logo-open-zfs
    Caption goes here

    Like that!

  • SEO: How many words long to make image alt text?

    Image alt text purpose

    When looking at making sure your image alt text works for your SEO purposes, don’t forget that one of the main purposes of alt text is to provide visually impaired people a description of the content they’re looking at. It can be easy to get carried away filling it up with SEO-oriented keywords, leaving it useless for screen readers and affecting the readability of your website for those who rely on screen readers. So, that said… When looking at your image alt text for SEO purposes, is longer better? Not necessarily!

    Current thinking regarding alt text

    According to here, here and here below 125 characters is good – probably 10-15 words is a sweet spot to aim for. Beyond that doesn’t seem to provide much usefulness for SEO.

    For visually impaired readers, however, there may be a benefit from having longer alt text component to the image – something to keep in mind when looking at your content. From the Penn State University link it seems that some screen readers break the text up into 125-character chunks, though, so longer than that limit may not work well anyway.

    Images that aren’t part of content

    If you don’t want to put alt text in for every image or have on-page images that aren’t part of the content, at least put in an empty entry – e.g.

    img src=”blah.jpg” alt=””

    That way screen readers will skip it and not say “image”.

    Modules/plugins relating to alt text

    There’s a Drupal plugin which scans your website for missing alt text; it’s a dev release but it may be worth looking at if you’re trying to revamp your site and ensure that the alt text is present and appropriate.

  • How to install Drupal 8 – Step by Step

    So, you have downloaded Drupal 8 from the downloads page (link here) and extracted it into your web directory. In our example we have used the RC4 release – we’ll update on release day if anything changes in the process. Here’s what you do next:

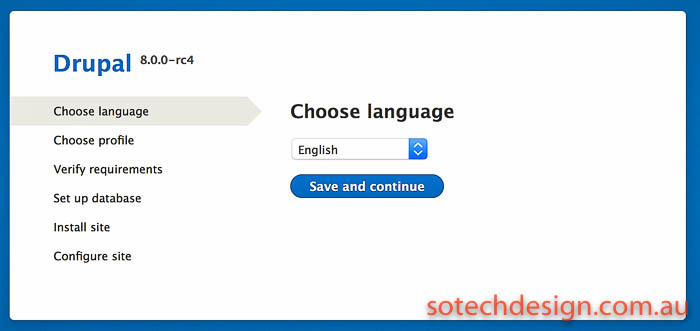
    Select your language – here English:

    sotechdesign-com-au-how-to-install-drupal-8-step-by-step-2

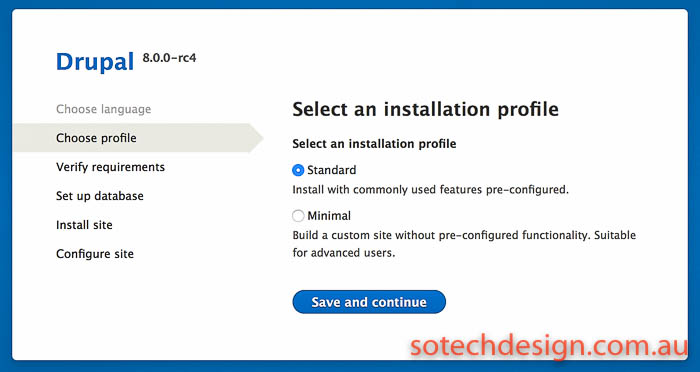
    Choose your installation profile. If you’re uncertain, choose “standard” – the minimal installation really is quite minimal and if this is your first Drupal experience the standard installation is a lot easier to start from.

    sotechdesign-com-au-how-to-install-drupal-8-step-by-step-5

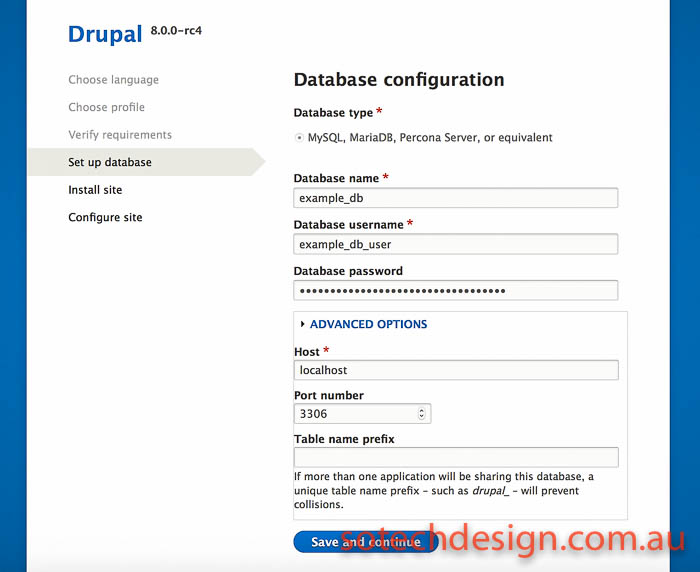
    On the next screen you have to enter your database details. We’ll do a future article on how to create a database and a user in mariaDB/mysql but for now, we’ll assume that you have already done that. If your database server is installed on the same machine/VPS that you’re installing Drupal on, leave the advanced settings alone – “localhost” will be correct for the location of the database, and the port should be correct unless you have specifically changed the mysql/mariaDB port!

    sotechdesign-com-au-how-to-install-drupal-8-step-by-step

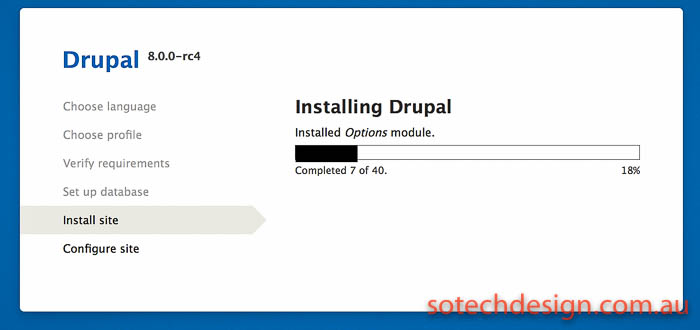
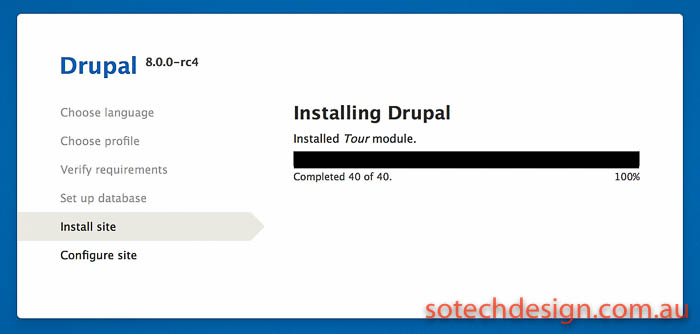
    Assuming you entered the database details correctly, the next screen should be the installing process progress bar:

    sotechdesign-com-au-how-to-install-drupal-8-step-by-step-7

    On our Binary Lane test VPS it took under a minute to complete:

    sotechdesign-com-au-how-to-install-drupal-8-step-by-step-8

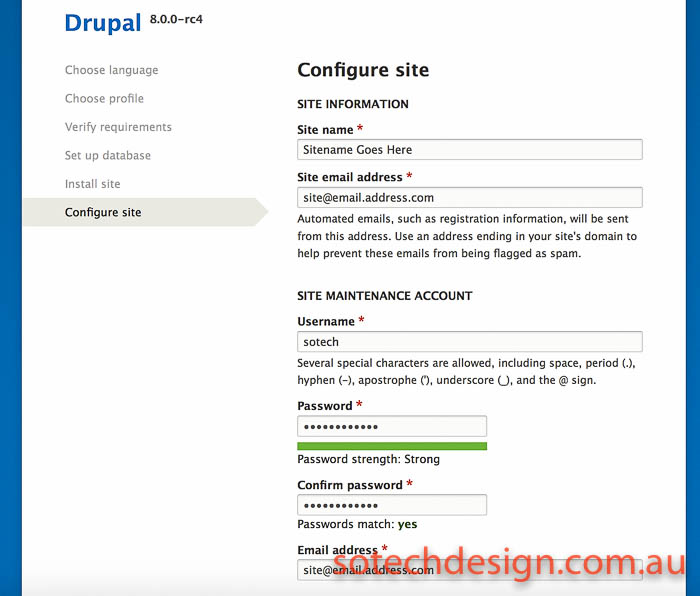
    Put in your site details in the next screen. We like to choose an administrative account name that isn’t “admin”. Make sure to choose a good password! The password strength meter here seems fairly harsh on rating your passwords, which is a good thing.

    sotechdesign-com-au-how-to-install-drupal-8-step-by-step-9

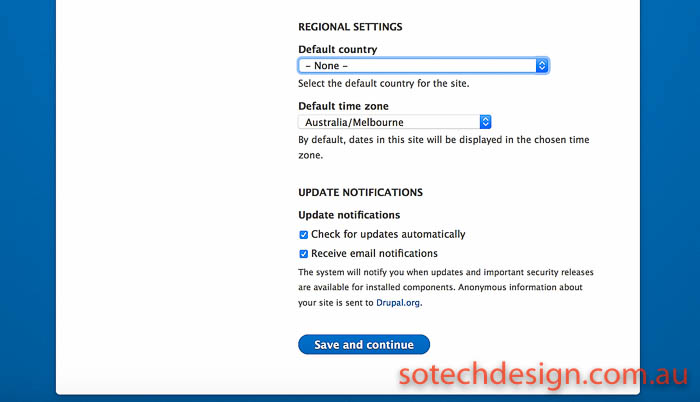
    Below that, select your default country and timezone settings:

    sotechdesign-com-au-how-to-install-drupal-8-step-by-step-6

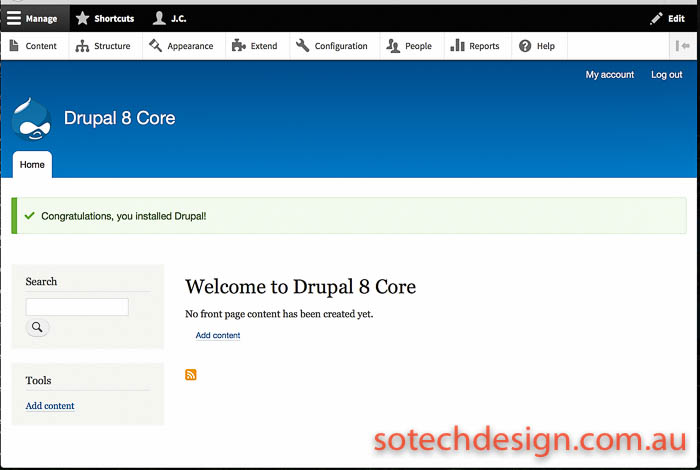
    The next screen is… drumroll… your new Drupal installation!

    sotechdesign-com-au-how-to-install-drupal-8-step-by-step-3

    It should be a quick and painless process – now enjoy your new Drupal 8 installation! There will be a lot of people trying out the new Drupal 8 once it’s released later this month – check back here for some more articles on the latest update to one of the best CMS’ around!

  • Installing Aegir 3 on Debian 8 Jessie/Ubuntu with Nginx

    So, after a few failed attempts at installing the Aegir 3 Drupal control system we hit upon this “recipe” as what works for us currently on a fresh install of Debian 8 Jessie or Ubuntu 14.04.

    This assumes you are logged in as root. First, update and upgrade your system.

    apt-get update && apt-get upgrade -y

    For the version of OS that currently gets installed with a fresh Binary Lane VPS we also need to update the base system. We like to use aptitude for that; while we’re installing aptitude, we might as well install the other thing that Aegir needs to install properly:

    apt-get install curl sendmail aptitude -y

    Upgrade:

    aptitude safe-upgrade -y

    Now, we need to install the database server. We use MariaDB.

    apt-get install mariadb-server -y

    One that’s done – you will be prompted to enter a root password for the database – we run the following command:

    mysql_secure_installation

    Don’t worry about changing the root password now that you have already set one, but delete the test database when prompted, disable anonymous access and flush privileges. Now we can install Aegir, nginx, php5-fpm etc.:

    echo “deb http://debian.aegirproject.org stable main” | sudo tee -a /etc/apt/sources.list.d/aegir-stable.list
    curl http://debian.aegirproject.org/key.asc | sudo apt-key add –
    apt-get update
    apt-get install aegir3 aegir3-provision aegir3-hostmaster nginx php5-fpm

    Enter the hostmaster URL – usually the fully qualified domain name. Enter the database root password once for provision and once for hostmaster.

    Assuming all of the above has gone well, you should be given a one-time-login link in your terminal at the end of the install process, e.g.:

    http://aegir.example.com.au/user/reset/1/1446598196/Nw4T4yd25IWEngCP2d2A_Ck3XslBiobnhbuNzXU4/login

    Now, before using that run the following:

    visudo

    Add this to the end of the file:

    Defaults:aegir !requiretty
    aegir ALL=NOPASSWD: /etc/init.d/nginx

    This gives Aegir – the aegir user – permission to restart nginx without requiring a sudo password.

    Test this works by doing the following:

    su – aegir
    sudo /etc/init.d/nginx restart

    What you want to see then is this:

    * Restarting nginx nginx
    [ OK ]

    Then:

    vim /etc/nginx/nginx.conf

    Comment out by putting a # in front of:

    # tcp_nopush on;
    # types_hash_max_size 2048;
    # error_log /var/log/nginx/error.log;

    Reboot, and use the one-time-link. You should be logged in fine and now can use Aegir!

  • OS X El Capitan downloaded but is not installing – how to fix it?

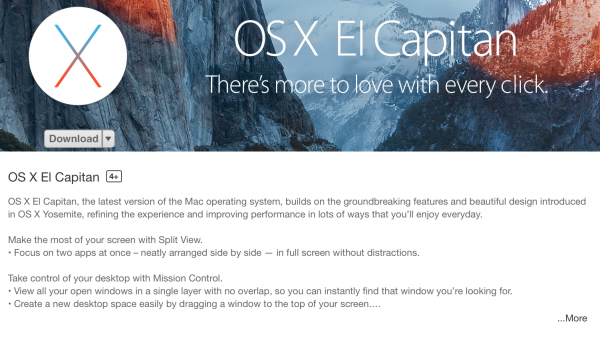
    When upgrading one of our MacBook Pros today we found that El Capitan downloaded but did nothing else, still showing “download” in the App Store:

    El Capitan downloaded but not installing? Read this post to find out how to install it.

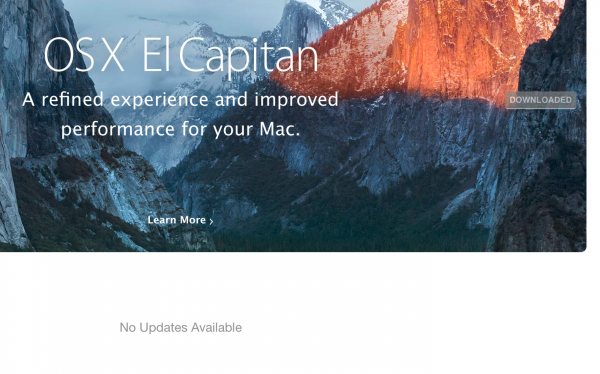
    Clicking on the “Download button here does nothing. Selecting the  “Updates” tab shows this:

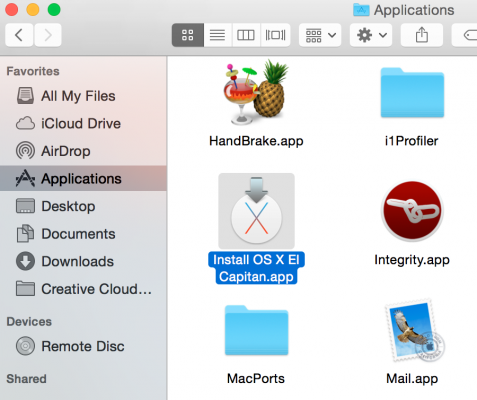
    El Capitan downloaded but not installing? Read this post to find out how to install it.Not super handy. However, assuming that it downloaded correctly we can kick off the installer from the Applications folder:


    El Capitan downloaded but not installing? Read this post to find out how to install it.

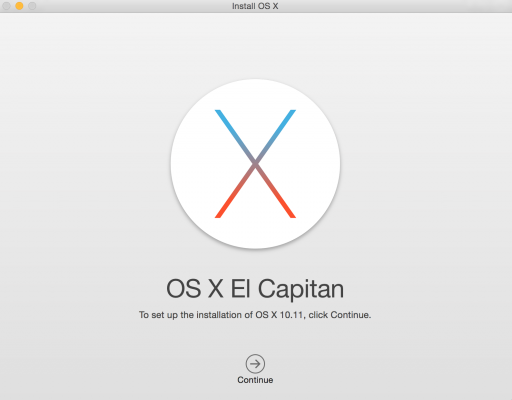
    This one’s easy – open it as though you would any application and you should see:

    El Capitan downloaded but not installing? Read this post to find out how to install it.

    Sorted. Good luck installing the new OS and enjoy! We’re pleased so far.

  • How to install just ab (apachebench) on Debian or Ubuntu

    Running nginx (or lighttpd, or any other web server) but still want to make use of Apache’s useful ab (apachebench) benchmarking tool?


    apt-get install apache2-utils


    …should do it.

  • Upload error 413 “Request Entity Too Large” on Nginx

    When trying to upload files to a Drupal installation running on nginx, we got a 413 error: Request Entity too large.


    We had gone through and updated the php files with regard to max upload file size limits, but had neglected to do the same to the nginx config file (/etc/nginx/nginx.conf on Debian). We had to add the following line:

    client_max_body_size 20M;


    in the http block and restart the nginx server to get uploads working again. The above will set the limit to 20MB; change it to suit your own environment and needs.


    You can also add this to the server or location blocks.

  • Securing Dokuwiki with nginx

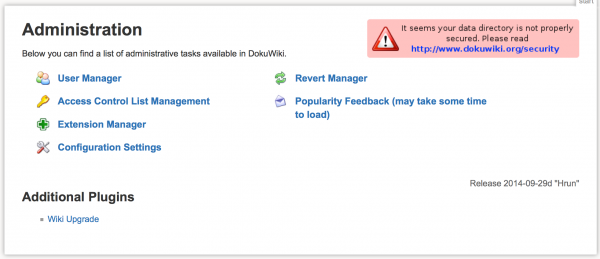
    After migrating a server from Apache2.4 to nginx a Dokuwiki install was complaining about the following on the admin page:

    Dokuwiki security error with nginx
    Dokuwiki security error with nginx


    Previously .htaccess files were controlling access, which aren’t used by nginx. You can test your Dokuwiki install’s access by attempting to visit the following url:


    http://yourserver.com/data/pages/wiki/dokuwiki.txt


    If you can see any content there, you need to fix your permissions. We fixed this by adding the following to the site’s nginx config file (e.g. /etc/nginx/sites-available/sitename):


    location ~ ^/(data|conf|bin|inc) {
    deny all;
    }


    …in the same section as the other “location” stanzas, then restarted nginx (whether the latter is necessary or not I don’t know, force of habit).

  • Drupal 7 – Two administrative menus after module installed

    In Drupal 7 when trying to use the module “Administration Menu” (quite a handy module) after enabling it we ended up with two menus or toolbars:

    Drupal 7 - Two menus or toolbars

    The fix for this is to disable the existing “Toolbar” module – this should remove the original toolbar and leave you with just the new Administration Menu menu/toolbar.

  • Drupal 7 – “Manage fields” missing from Content Type admin page

    When trying to add file uploads to the “page” content type creation, we found that the Manage Fields section was missing (Structure -> Content Types).


    In this case it turned out that the module Field UI had been disabled; re-enabling that module brought the Manage Fields option back.