Category: How-To

  • Debian: How to see what has recently been upgraded or updated through apt-get

    Forgotten what it was you last updated, or want to check what someone else has been updating? There’s a log file for that, and it’s located at:


    /var/log/apt/history.log


    To view it, run:


    less /var/log/apt/history.log


    Looking for an older logfile? They’re kept, too. To see the other log files available, view the directory using ls:


    ls /var/log/apt/


    It should look something like:


    history.log  history.log.1.gz  history.log.2.gz  history.log.3.gz  history.log.4.gz  term.log  term.log.1.gz  term.log.2.gz  term.log.3.gz  term.log.4.gz


    One further note – This will show the most recent things done with apt, not just upgrades.

  • Thunderbird and Google Apps or Gmail – wrong password message despite correct password being entered

    This is a frustrating issue – you have youreslf a shiny new Gmail or Google apps account, but for some reason when you try to add the account to Thunderbird it complains about your password being incorrect:


    Configuration could not be verified – is the user name or password wrong?


    After double checking that the password is indeed correct, the most common cause we have found for this is that IMAP is disabled in your gmail settings. Log into your gmail via a web browser and click on the gear in the top right, then select:


    Settings -> Forwarding and Pop/IMAP


    Once you are in the Forwarding and Pop/IMAP tab, scroll down until you see:

    IMAP Access


    Hopefully the radio button for Disable IMAP is selected. If so, select “Enable IMAP”, save your settings and try again. Hopefully that ends your frustrating login attempts!

  • OS X Mavericks: How to show the date in the menu bar


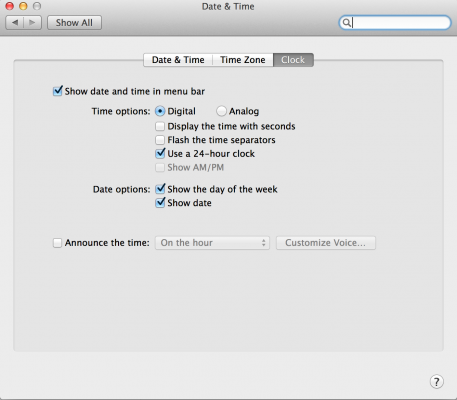
    This one is nice and easy – go to System Preferences -> Date & Time -> Clock and then tick “Show Date”:


    apple-os-x-mavericks-show-date-in-menu-bar

    A small thing, but quite useful.

  • Fedora 20: ifconfig missing on minimal install


    If you have selected the minimal install option you might be surprised by just how minimal it is; one example is that the ifconfig command is not available. The command yum install ifconfig doesn’t work – it’s part of another broader package. We can find out which one that is by running:

    yum provides ifconfig


    Through that we can see that the net-tools package installs it. Run:


    yum install net-tools


    …and you should be able to now use ifconfig.

  • How to kill a KVM virtual machine in Promox via the command line or terminal


    Sometimes a Proxmox KVM VM will stop responding to the GUI’s attempts to shut it down; fortunately it’s easy to shut it down from the command line. Make note of the VM ID (next to the name of the VM in the left pane of the Proxmox GUI), log into the server via SSH as root and run:


    qm stop [vmid]


    e.g.:


    qm stop 124


    Check back in the GUI a few seconds later and you should see that the KVM has stopped.

  • How to cache yum repositories on CentOS using apt-cacher-ng on Debian or Ubuntu


    If you have a lot of virtual (or real) machines running Debian or Ubuntu and a limited internet connection, it can make a lot of sense to use apt-cacher-ng to create a local cache of the packages you use so that they are only downloaded once. The current version of apt-cacher-ng can also help out with yum repositories!


    On CentOS, edit /etc/yum.conf and add:


    proxy=http://[ip-of-your-local-apt-cacher-ng-server]:3142


    If you have changed the default port of apt-cacher-ng from 3142, you will need to modify that. Our example file:


    [main]
    cachedir=/var/cache/yum/$basearch/$releasever
    keepcache=0
    debuglevel=2
    logfile=/var/log/yum.log
    exactarch=1
    obsoletes=1
    gpgcheck=1
    plugins=1
    installonly_limit=5
    bugtracker_url=http://bugs.centos.org/set_project.php?project_id=16&ref=http://bugs.centos.org/bug_report_page.php?category=yum
    distroverpkg=centos-release
    proxy=http://10.1.1.12:3142

    #  This is the default, if you make this bigger yum won’t see if the metadata
    # is newer on the remote and so you’ll “gain” the bandwidth of not having to
    # download the new metadata and “pay” for it by yum not having correct
    # information.
    #  It is esp. important, to have correct metadata, for distributions like
    # Fedora which don’t keep old packages around. If you don’t like this checking
    # interupting your command line usage, it’s much better to have something
    # manually check the metadata once an hour (yum-updatesd will do this).
    # metadata_expire=90m

    # PUT YOUR REPOS HERE OR IN separate files named file.repo
    # in /etc/yum.repos.d


    As you can see, our local apt-cacher-ng VM is 10.1.1.12.


    Run yum update and check your apt-cacher-ng’s cache – you should now see some CentOS respositories cached there.
  • How to reset a user password in Windows without knowing the original password


    Today we were asked how to reset a Windows user password (in this case the administrator account for a Windows Home Server 2011 install) without knowing the original password. The user had a logged-in Administrator session but had typo’d their password twice successfully during the install and was not keen on reinstalling then repeating the several hours of setup they had just completed.


    If this happens to you, open up a CMD window with Administrator privileges (in the WHS 2011 example the CMD window automatically has these) and type the following:


    net user [username] *


    In this case:


    net user administrator *


    You will be prompted to enter a new password without having to provide the existing password first. To get a list of the users on the system, you can run:


    net users


    Use this for good, not evil!

  • Postfix basic example – how to send an email from the command line


    If you have a system with a working Postfix install (in this case, it’s likely that it was configured during install) and you want to send an email from the command line, you can do so with the following:


    mail -s “subject” [email protected]

    email content goes here

    .


    Type in the first line, hit enter, type out your content, hit enter, type a single fullstop, hit enter, and your email is sent!