Category: Ubuntu

  • Changing or Updating the time zone in Ubuntu Server


    There are quite a few reasons you may find that you need to change your time zone – for example, if you’re using a pre-made image for a virtual machine you may find that the default timezone is not set to your country. You can change the time manually, though there is a quick and easy way:


    sudo dpkg-reconfigure tzdata


    This reconfigures the tzdata (timezone data) package and runs you through a series of prompts asking which country/city you live in, and updates the time accordingly.


    You can check the current system time with:


    date


    to verify that it worked!

  • Installing Xen on Ubuntu: Error “makeinfo is missing on your system”


    This is another error that seems to crop up when making Xen on Ubuntu – you can fix it by installing the texinfo package:


    sudo apt-get install texinfo


    The error message should now no longer appear.

  • Installing Xen on Ubuntu: Error bits/predefs.h: No such file or directory


    This error cropped up when we were building Xen on a system running Ubuntu 12.04 Server:


    /usr/include/features.h:324:26: fatal error: bits/predefs.h: No such file or directory


    To get past this point, install gcc-multilib.


    sudo apt-get install gcc-multilib


    The required files are around 20MB and should allow you to get past that point of “make”.

  • Ubuntu: How to delete a user


    In Ubuntu 12.04 and 12.10, to delete an additional user you have created, use the following:


    sudo deluser [username]


    By example, if we wanted to delete a user we created called “test”, we would run:


    sudo deluser test


    Which gives:


    Removing user `test’ …

    Warning: group `test’ has no more members.

    Done.


    Be careful with this – don’t delete your admin account 🙂

  • Ubuntu: How to add a existing user to an existing group


    To add an existing user to a second group, use the following command:


    sudo usermod -a -G [group] [user]


    e.g.:


    sudo usermod -a -G geeks bob


    This will add the user bob to the group geeks.

  • Ubuntu Server: How to change to the root user


    Some guides tell you to enter “su” on Unix systems to get superuser permissions; in Ubuntu, however, this won’t work. As a user with sudo permissions (the user created on install has these) enter the following instead:


    sudo su


    Enter your account password and voila, you are logged in as root. You can tell when you are logged in as root as your prompt will look like:


    root@luna:/home/#


    rather than:


    tma1@luna:/home$


    Note the # rather than the $? This indicates that you’re performing actions as the root user. This can be dangerous as you will be able to do things which can wreck your system irreparably, so be careful! To go back to working as your usual user, type:


    exit


    or hit CTRL+D.

  • Ubuntu Server Benchmarks: Geekbench


    This is one of our favourite benchmarks for Ubuntu Server – it’s cross-platform, meaning that it can be ran on Windows, Mac OS X, Ubuntu Desktop, Ubuntu Server and more. You can get the download link from the following site:


    http://www.primatelabs.com/geekbench/download/linux/


    Currently this works:


    wget http://d34wv75roto0rl.cloudfront.net/Geekbench-2.4.2-Linux.tar.gz


    Unzip:


    gunzip Geekbench-2.4.2-Linux.tar.gz


    Untar:


    tar -xvf Geekbench-2.4.2-Linux.tar.gz


    Change directory to the new files:


    cd dist/Geekbench-2.4.2-Linux


    If you have a license key, enter it like so:


    ./geekbench_x86_64 -r [youremail] [license]


    Then run the 64-bit:


    ./geekbench_x86_64


    If you don’t, use the 32-bit version:


    ./geekbench_x86_32


    Note! If you haven’t installed the ia32-libs package the 32-bit Geekbench will not work on a 64-bit system! Running the benchmarks will give you output similar to the following – a brief rundown of the system setup followed by the benchmark results as they happen:


    System Information
    Operating System      Ubuntu 12.04.2 LTS 3.2.0-38-generic x86_64
    Model                 VMware, Inc. VMware Virtual Platform
    Motherboard           Intel Corporation 440BX Desktop Reference Platform
    Processor             Intel Xeon E5-2630 @ 2.30 GHz
    2 Processors, 6 Cores, 6 Threads
    Processor ID          GenuineIntel Family 6 Model 45 Stepping 7
    L1 Instruction Cache  32.0 KB
    L1 Data Cache         32.0 KB
    L2 Cache              256 KB
    L3 Cache              15.0 MB
    Memory                19.6 GB
    BIOS                  Phoenix Technologies LTD 6.00

    Integer
    Blowfish
    single-threaded scalar   1647 ||||||
    multi-threaded scalar   10574 ||||||||||||||||||||||||||||||||||||||||
    Text Compress
    single-threaded scalar   2485 |||||||||
    multi-threaded scalar   14490 ||||||||||||||||||||||||||||||||||||||||
    Text Decompress
    single-threaded scalar   2980 |||||||||||
    multi-threaded scalar   18177 ||||||||||||||||||||||||||||||||||||||||
    Image Compress
    single-threaded scalar   2208 ||||||||
    multi-threaded scalar   12950 ||||||||||||||||||||||||||||||||||||||||
    Image Decompress
    single-threaded scalar   2733 ||||||||||
    multi-threaded scalar   16503 ||||||||||||||||||||||||||||||||||||||||
    Lua
    single-threaded scalar   4460 |||||||||||||||||
    multi-threaded scalar   26572 ||||||||||||||||||||||||||||||||||||||||

    Floating Point
    Mandelbrot
    single-threaded scalar   2194 ||||||||
    multi-threaded scalar   13365 ||||||||||||||||||||||||||||||||||||||||
    Dot Product
    single-threaded scalar   3558 ||||||||||||||
    multi-threaded scalar   22600 ||||||||||||||||||||||||||||||||||||||||
    single-threaded vector   4130 ||||||||||||||||
    multi-threaded vector   29112 ||||||||||||||||||||||||||||||||||||||||
    LU Decomposition
    single-threaded scalar   2791 |||||||||||
    multi-threaded scalar   16599 ||||||||||||||||||||||||||||||||||||||||
    Primality Test
    single-threaded scalar   6190 ||||||||||||||||||||||||
    multi-threaded scalar   29957 ||||||||||||||||||||||||||||||||||||||||
    Sharpen Image
    single-threaded scalar   5657 ||||||||||||||||||||||
    multi-threaded scalar   34118 ||||||||||||||||||||||||||||||||||||||||
    Blur Image
    single-threaded scalar   2287 |||||||||
    multi-threaded scalar   13782 ||||||||||||||||||||||||||||||||||||||||

    Memory
    Read Sequential
    single-threaded scalar   4657 ||||||||||||||||||
    Write Sequential
    single-threaded scalar   6769 |||||||||||||||||||||||||||
    Stdlib Allocate
    single-threaded scalar   4084 ||||||||||||||||
    Stdlib Write
    single-threaded scalar   1872 |||||||
    Stdlib Copy
    single-threaded scalar   3674 ||||||||||||||

    Stream
    Stream Copy
    single-threaded scalar   5435 |||||||||||||||||||||
    single-threaded vector   7031 ||||||||||||||||||||||||||||
    Stream Scale
    single-threaded scalar   5668 ||||||||||||||||||||||
    single-threaded vector   6441 |||||||||||||||||||||||||
    Stream Add
    single-threaded scalar   5311 |||||||||||||||||||||
    single-threaded vector   7203 ||||||||||||||||||||||||||||
    Stream Triad
    single-threaded scalar   5556 ||||||||||||||||||||||
    single-threaded vector   5082 ||||||||||||||||||||

    Benchmark Summary
    Integer Score              9648 ||||||||||||||||||||||||||||||||||||||
    Floating Point Score      13310 ||||||||||||||||||||||||||||||||||||||||
    Memory Score               4211 ||||||||||||||||
    Stream Score               5965 |||||||||||||||||||||||

    Geekbench Score            9474 |||||||||||||||||||||||||||||||||||||

    Upload results to the Geekbench Browser? [Y/n]


    If you upload the results, you can add them to a Geekbench account by accessing a web link – such as:


    Upload results to the Geekbench Browser? [Y/n]y

    Uploading results to the Geekbench Browser. This could take a minute or two
    depending on the speed of your internet connection.

    Upload succeeded. Visit the following link and view your results online:

    http://browser.primatelabs.com/geekbench2/18911

    Visit the following link and add this result to your profile:

    http://browser.primatelabs.com/geekbench2/claim/18911?key=572432

    root@luna:/home/tma1/geekbench/dist/Geekbench-2.4.2-Linux#


    Put the address it gives you into a browser and you will be able to gather results over time to compare systems/virtual machines! Geekbench is one of the best Ubuntu Server benchmarks that we have come across – it provides you with a range of tests which are easy to compare, as well as giving you an overall score figure to give you an idea of how the system performs overall vs. other setups. The fact that it is cross-platform is a great bonus, too, as it means you can test the efficiency and performance of a variety of operating systems on the same hardware/virtual hardware setups – and the results can be very interesting. Highly recommended!
  • Ubuntu Server Benchmarks: Phoronix Test Suite


    The Phoronix Test Suite is another option when it comes to benchmarking your Ubuntu Server – this one doesn’t work out-of-the-box and requires you to choose the types of benchmarks you wish to run and install them either individually or as suites of benchmarks. You can download it at the following link currently:


    wget http://phoronix-test-suite.com/releases/repo/pts.debian/files/phoronix-test-suite_4.4.1_all.deb


    Then:


    chmod +x phoronix-test-suite_4.4.1_all.deb


    Install like so:


    dpkg -i phoronix-test-suite_4.4.1_all.deb


    You can run it for the first time with the following:


    phoronix-test-suite


    You will be shown a page of the package’s terms and conditions and prompted to accept them. To see a list of available benchmarks, run:


    phoronix-test-suite list-tests


    If you wanted to install the blake2 benchmark as an example, you would run:


    phoronix-test-suite install blake2


    This will install the blake2 test and try to address any unmet dependencies (e.g. install packages which that benchmark requires to run that aren’t already installed). To run an installed test, issue the following command (using blake2 as an example again):


    phoronix-test-suite benchmark blake2


    If you are interested in running a suite of tests (or just want to run a few tests without having to individually install the lot of them) you can list whole suites of tests at once with:


    phoronix-test-suite list-available-suites


    The install process is the same as for an individual test:


    phoronix-test-suite install [suitename]


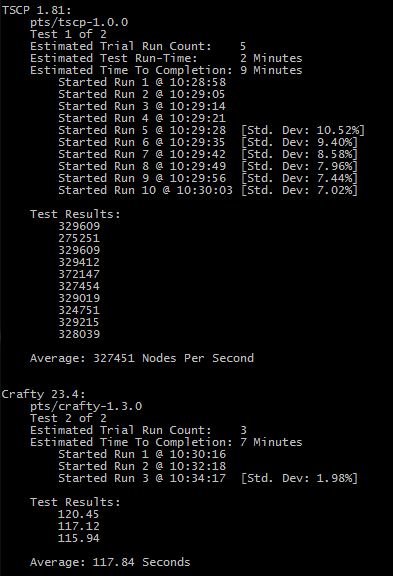
    If you’re looking to measure a specific metric there’s plenty to choose from here – there’s a lengthy list of available tests and suites. As an example of results, here’s the chess benchmark:


    ubuntuBenchmark-phoronix-chess

  • Ubuntu Server Benchmarks: Hardinfo


    Hardinfo is one of the command-line benchmarks available for Ubuntu Server – it does have graphical features so it will also be useful for Ubuntu Desktop users, but for the purpose of this piece we will assume you’re at a terminal. It not only runs benchmarks like Blowfish but also shows you a great deal of information about the system itself, like ARP tables, sensors, CPU/RAM details and more.


    To install, run the following:


    sudo apt-get install hardinfo


    You can run it without using less to view the results, but you’ll probably want to pipe the results to less to make it a bit easier to navigate the pages of text. Run it with the following:


    hardinfo | less


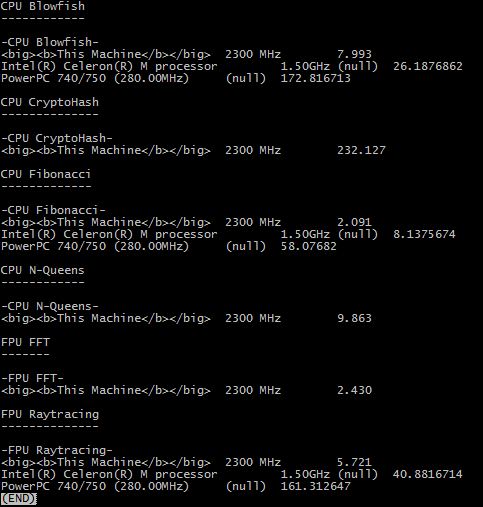
    This pipes the output to the “less” command – once the command completes you will be able to navigate the results with the up/down and pageup/pagedown keys. To quit less press “q”. At the bottom of the results are the benchmarks; they will look something akin to this:


    ubuntuBenchmark-hardinfo


    The benchmark in this case was run on an ESXi VM with two 2.3GHz CPUs. It’s not the prettiest output but it provides quite a bit of potentially useful information. The output from hardinfo is a whole lot prettier when you have a GUI!

  • How to set up SNMP monitoring (snmpd) on Ubuntu 12.04


    This one caused a bit of hassle recently – a few online guides don’t seem to work with the current version of Ubuntu. We found that this works, at least in the ~10 or so servers we have tried so far:


    sudo apt-get install snmpd


    Back up your snmpd.conf file:


    sudo mv /etc/snmp/snmpd.conf /etc/snmp/snmpd.conf.old


    Create a new file:


    sudo touch /etc/snmp/snmpd.conf


    Edit with your chosen editor and put in the following:


    rocommunity public

    syslocation “Describe the server’s location”

    syscontact [email protected]


    Save and exit. Now edit the following file:


    /etc/default/snmpd


    Comment out the following line by putting a # before it:


    SNMPDOPTS=’-Lsd -Lf /dev/null -u snmp -g snmp -I -smux -p /var/run/snmpd.pid’


    On the next blank line add the following:


    SNMPDOPTS=’-Lsd -Lf /dev/null -u snmp -I -smux -p /var/run/snmpd.pid -c /etc/snmp/snmpd.conf’


    Save the file and restart the SNMP daemon:


    sudo /etc/init.d/snmpd restart


    Now you should be able to successfully snmpwalk locally and from machines on the local network.