Category: How-To

  • Debian Wheezy: /etc/sudoers missing


    If you’re looking to add something to the /etc/sudoers file in a Debian Wheezy install, you may find that the file isn’t there! To create the file while logged in as the root user you need to install the sudo package:


    apt-get install sudo


    Once that install completes the file will appear:


    #
    # This file MUST be edited with the ‘visudo’ command as root.
    #
    # Please consider adding local content in /etc/sudoers.d/ instead of
    # directly modifying this file.
    #
    # See the man page for details on how to write a sudoers file.
    #
    Defaults        env_reset
    Defaults        mail_badpass
    Defaults        secure_path=”/usr/local/sbin:/usr/local/bin:/usr/sbin:/usr/bin:/sbin:/bin”

    # Host alias specification

    # User alias specification

    # Cmnd alias specification

    # User privilege specification
    root    ALL=(ALL:ALL) ALL

    # Allow members of group sudo to execute any command
    %sudo   ALL=(ALL:ALL) ALL

    # See sudoers(5) for more information on “#include” directives:

    #includedir /etc/sudoers.d


  • Awk: Remove everything after the first word in each line


    Another awk question. How to remove everything after the first word in each line? E.g., if we wanted to remove everything but the names in this input (FILENAME.txt):


    Anna 123 09123 Main Street

    Bob 109 09800 Smith Street

    Joe 0981 123123 King Street


    We can use awk like so:


    awk ‘{ print $1 }’


    e.g.:


    cat FILENAME.txt | awk ‘{ print $1 }’


    which will print:


    Anna

    Bob

    Joe


    Short and sweet.

  • Debian 7 (Wheezy) – no smbpasswd command


    If you have installed samba/cifs-utils/etc. and are trying to set your users up on a Debian 7 system, you might be surprised to find that the smbpasswd command seems to be missing. It’s actually part of the samba-common-bin package, which you can install via:


    sudo apt-get install samba-common-bin


    …and you should have your command.

  • Proxmox 3.2: Finding the container CTID from the command line


    If you are in a terminal and want to find the container IDs (CTID) quickly without opening up a browser, run the following:


    vzlist


    It should return a list of the container IDs, the VM state, their IP addresses and hostnames like so:


          CTID      NPROC STATUS    IP_ADDR         HOSTNAME
    100         25 running   10.1.1.51       nyx.luna.com
    101         17 running   10.1.1.65       euphrosyne.luna.com
    102         58 running   10.1.1.22       metis.luna.com
    103         15 running   10.1.1.25       curo.luna.com
    104         52 running   10.1.1.60       ogmios.luna.com

    Quick and easy.

  • Proxmox 3.2: Enabling NFS on a container (CT) VM


    If you’re trying to figure out why you are getting NFS errors despite having NFS set up properly on the host machine and client VM, this may be the answer. With the VM powered off, run at the Proxmox terminal:


    vzctl set [VM ID] --features "nfs:on" --save


    The next time the VM is powered up NFS should be enabled and you should be able to mount shares correctly. An example:


    vzctl set 104 --features "nfs:on" --save


  • How to find the user id – uid – for a user in Linux


    This one is straight-forward for CentOS, Ubuntu and others distros:


    id -u [username]


    e.g.


    id -u bob


    That will give a numeric result like 500 or 1001.

  • Rsync error when connecting to CentOS: rsync error: error in rsync protocol data stream (code 12) at io.c(600) [sender=3.0.6]


    We helped rebuild a backup VM which receives data over rsync today; the first rsync attempt failed with the vague error message:


    rsync error: error in rsync protocol data stream (code 12) at io.c(600) [sender=3.0.6]


    The problem ended up being that the rsync package was not installed. A simple:


    yum install rsync -y


    …fixed the problem and shortly the backups were back to normal.

  • Krita: Where are the curves?


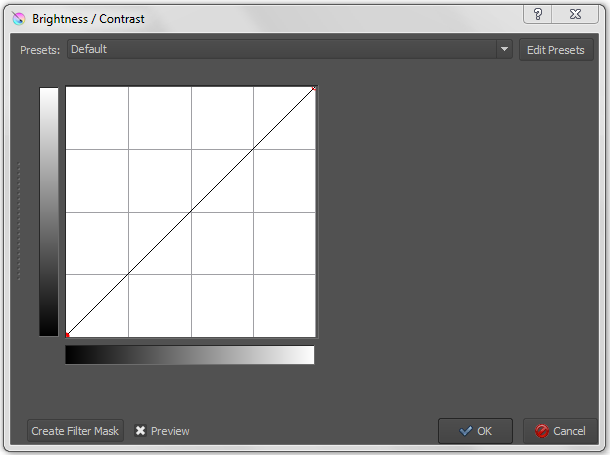
    One of the most common things photographers use when it comes to editing images in Photoshop is the curves function. If you’re trying out Krita for the first time you may be looking for it – it’s in the following menu:


    Filter -> Adjust -> Brightness/Contrast curve


    The pop-up box should look familiar to those who have used curves in other editing applications:


    krita-brightness-and-contrast-curve-popup


  • How to install the NFS client packages on Fedora 20 and automatically mount NFS shares


    We were asked how to set up a Fedora 20 virtual machine to access folders on an already-set-up Ubuntu Server machine using NFS. A folder has been created on the Fedora VM to mount the NFS share to (/opt/documents in this case). First we install the relevant packages on Fedora:


    sudo yum install nfs-utils nfs-utils-lib


    Examine the package list, and if nothing looks awry hit Y to install. Now edit your fstab and add this line to the bottom to automount the shares:


    [ip.of.nfs.server]:[absolute-path-to-share] [absolute-path-to-fedora-mount-point] nfs auto 0 0


    e.g., in this example:


    10.1.1.3:/tank/documents /opt/documents nfs auto 0 0


    To break this down: the static IP address of the NFS server is 10.1.1.3, the path on the Ubuntu machine to the share is /tank/documents, and the created directory to mount the NFS share to is /opt/documents on the Fedora VM. To mount everything in fstab, run:


    mount -a


    Then navigate to the /opt/documents directory and check that you can read/write onto the NFS share correctly. Reboot the server to make sure everything works OK and you should be done!

  • How to check the shutter count or actuations of a Canon 5D Mark III (and other DSLRs) using Ubuntu Server


    First, we install the required packages:


    sudo apt-get install gphoto2 libgphoto2-6


    Once that’s done installing, plug in your camera via it’s USB port and check that it is visible to the system:


    lsusb


    You should see an output along the lines of:

    Bus 002 Device 002: ID 8087:8000 Intel Corp.
    Bus 002 Device 001: ID 1d6b:0002 Linux Foundation 2.0 root hub
    Bus 001 Device 002: ID 8087:8008 Intel Corp.
    Bus 001 Device 001: ID 1d6b:0002 Linux Foundation 2.0 root hub
    Bus 004 Device 001: ID 1d6b:0003 Linux Foundation 3.0 root hub
    Bus 003 Device 008: ID 051d:0002 American Power Conversion Uninterruptible Power Supply
    Bus 003 Device 007: ID 046b:ff31 American Megatrends, Inc.
    Bus 003 Device 006: ID 046b:ff40 American Megatrends, Inc.
    Bus 003 Device 005: ID 046b:ff20 American Megatrends, Inc.
    Bus 003 Device 004: ID 046b:ff10 American Megatrends, Inc. Virtual Keyboard and Mouse
    Bus 003 Device 002: ID 046b:ff01 American Megatrends, Inc.
    Bus 003 Device 009: ID 04a9:323a Canon, Inc.
    Bus 003 Device 001: ID 1d6b:0002 Linux Foundation 2.0 root hub

    You may have less or a lot more, depending on your system and how many USB devices you have connected. Assuming you have no other Canon devices connected, the part you’re looking for will have Canon in the line – here:


    Bus 003 Device 009: ID 04a9:323a Canon, Inc.


    You can also check using the dmesg command – once you have connected the camera there will be output at the end similar to:


    [1798492.201275] usb 3-10: new high-speed USB device number 9 using xhci_hcd
    [1798492.218967] usb 3-10: New USB device found, idVendor=04a9, idProduct=323a
    [1798492.218975] usb 3-10: New USB device strings: Mfr=1, Product=2, SerialNumber=0
    [1798492.218980] usb 3-10: Product: Canon Digital Camera
    [1798492.218984] usb 3-10: Manufacturer: Canon Inc.

    Now we can run the following command:


    gphoto2 –get-config /main/status/shuttercounter


    You should then see the shutter count:


    Label: Shutter Counter
    Type: TEXT
    Current: 31791


    For this Canon 5D Mark III, the shutter count is 31,791. Lightly used!


    To see a list of supported cameras for this method, see:


    http://gphoto.org/proj/libgphoto2/support.php