Category: How-To

  • ZFS: Adding a new mirror to an existing ZFS pool


    Mirrored vdevs are great for performance and it is quite straight-forward to add a mirrored vdev to an existing pool (presumably one with one or more similar vdevs already):


    zpool add [poolname] mirror [device01] [device02] [device03]


    If it’s a two-way mirror you will only have two devices in the above. An example for ZFS on Ubuntu with a pool named seleucus and two SSDs could look like:


    zpool add seleucus mirror ata-SAMSUNG_SSD_830_Series_S0XYNEAC705640 ata-M4-CT128M4SSD2_000000001221090B7BF9


    As always, it’s good practice to use the device name found in /dev/disk/by-id/ rather than the sda, sdb, sdc etc. names as the latter can change – the former do not.

  • XenServer 6.2: Passing through multiple PCI or PCI Express devices to a Virtual Machine (VM)


    Following the previous article on passing through a PCI or PCI Express card to a virtual machine someone asked what the syntax was to pass through multiple devices to a VM. Using our previous system as an example, we run lspci to find each item we want to pass through. Using the same system as last time, we will pass through these two devices:


    03:00.0 Multimedia controller: Philips Semiconductors SAA7164 (rev 81)

    01:03.0 Multimedia audio controller: C-Media Electronics Inc CMI8788 [Oxygen HD Audio]


    The /boot/extlinux.conf file should be edited the same as before, except that we separate each device’s number with a space, e.g.:


    pciback.hide=(03:00.0) (01:03.0)


    You can keep on adding more devices if you have more to pass through in the same fashion. Follow the rest of the instructions, and when it comes to adding them to the VM configuration you can do it like so:


    xe vm-param-set other-config:pci=0/0000:03:00.0,0/0000:01:03.0 uuid=[uuid]


    Note that there is only a comma, no space between the PCI addresses. That’s it!

  • XenServer 6.2: How to set up passthrough of a PCI or PCI-Express device


    This is done by logging in as the root user to your XenServer system via SSH. To see the PCI devices available to your system, enter the following command:


    lspci


    Here is an example result:


    00:00.0 Host bridge: Advanced Micro Devices, Inc. [AMD/ATI] RD890 Northbridge only dual slot (2×16) PCI-e GFX Hydra part (rev 02)
    00:00.2 IOMMU: Advanced Micro Devices, Inc. [AMD/ATI] RD990 I/O Memory Management Unit (IOMMU)
    00:02.0 PCI bridge: Advanced Micro Devices, Inc. [AMD/ATI] RD890 PCI to PCI bridge (PCI express gpp port B)
    00:09.0 PCI bridge: Advanced Micro Devices, Inc. [AMD/ATI] RD890 PCI to PCI bridge (PCI express gpp port H)
    00:0a.0 PCI bridge: Advanced Micro Devices, Inc. [AMD/ATI] RD890 PCI to PCI bridge (external gfx1 port A)
    00:0b.0 PCI bridge: Advanced Micro Devices, Inc. [AMD/ATI] RD890 PCI to PCI bridge (NB-SB link)
    00:0c.0 PCI bridge: Advanced Micro Devices, Inc. [AMD/ATI] RD890S PCI Express bridge for GPP2 port 1
    00:11.0 SATA controller: Advanced Micro Devices, Inc. [AMD/ATI] SB7x0/SB8x0/SB9x0 SATA Controller [AHCI mode]
    00:12.0 USB controller: Advanced Micro Devices, Inc. [AMD/ATI] SB7x0/SB8x0/SB9x0 USB OHCI0 Controller
    00:12.1 USB controller: Advanced Micro Devices, Inc. [AMD/ATI] SB7x0 USB OHCI1 Controller
    00:12.2 USB controller: Advanced Micro Devices, Inc. [AMD/ATI] SB7x0/SB8x0/SB9x0 USB EHCI Controller
    00:13.0 USB controller: Advanced Micro Devices, Inc. [AMD/ATI] SB7x0/SB8x0/SB9x0 USB OHCI0 Controller
    00:13.1 USB controller: Advanced Micro Devices, Inc. [AMD/ATI] SB7x0 USB OHCI1 Controller
    00:13.2 USB controller: Advanced Micro Devices, Inc. [AMD/ATI] SB7x0/SB8x0/SB9x0 USB EHCI Controller
    00:14.0 SMBus: Advanced Micro Devices, Inc. [AMD/ATI] SBx00 SMBus Controller (rev 3d)
    00:14.1 IDE interface: Advanced Micro Devices, Inc. [AMD/ATI] SB7x0/SB8x0/SB9x0 IDE Controller
    00:14.3 ISA bridge: Advanced Micro Devices, Inc. [AMD/ATI] SB7x0/SB8x0/SB9x0 LPC host controller
    00:14.4 PCI bridge: Advanced Micro Devices, Inc. [AMD/ATI] SBx00 PCI to PCI Bridge
    00:14.5 USB controller: Advanced Micro Devices, Inc. [AMD/ATI] SB7x0/SB8x0/SB9x0 USB OHCI2 Controller
    00:18.0 Host bridge: Advanced Micro Devices, Inc. [AMD] Family 15h Processor Function 0
    00:18.1 Host bridge: Advanced Micro Devices, Inc. [AMD] Family 15h Processor Function 1
    00:18.2 Host bridge: Advanced Micro Devices, Inc. [AMD] Family 15h Processor Function 2
    00:18.3 Host bridge: Advanced Micro Devices, Inc. [AMD] Family 15h Processor Function 3
    00:18.4 Host bridge: Advanced Micro Devices, Inc. [AMD] Family 15h Processor Function 4
    00:18.5 Host bridge: Advanced Micro Devices, Inc. [AMD] Family 15h Processor Function 5
    00:19.0 Host bridge: Advanced Micro Devices, Inc. [AMD] Family 15h Processor Function 0
    00:19.1 Host bridge: Advanced Micro Devices, Inc. [AMD] Family 15h Processor Function 1
    00:19.2 Host bridge: Advanced Micro Devices, Inc. [AMD] Family 15h Processor Function 2
    00:19.3 Host bridge: Advanced Micro Devices, Inc. [AMD] Family 15h Processor Function 3
    00:19.4 Host bridge: Advanced Micro Devices, Inc. [AMD] Family 15h Processor Function 4
    00:19.5 Host bridge: Advanced Micro Devices, Inc. [AMD] Family 15h Processor Function 5
    00:1a.0 Host bridge: Advanced Micro Devices, Inc. [AMD] Family 15h Processor Function 0
    00:1a.1 Host bridge: Advanced Micro Devices, Inc. [AMD] Family 15h Processor Function 1
    00:1a.2 Host bridge: Advanced Micro Devices, Inc. [AMD] Family 15h Processor Function 2
    00:1a.3 Host bridge: Advanced Micro Devices, Inc. [AMD] Family 15h Processor Function 3
    00:1a.4 Host bridge: Advanced Micro Devices, Inc. [AMD] Family 15h Processor Function 4
    00:1a.5 Host bridge: Advanced Micro Devices, Inc. [AMD] Family 15h Processor Function 5
    00:1b.0 Host bridge: Advanced Micro Devices, Inc. [AMD] Family 15h Processor Function 0
    00:1b.1 Host bridge: Advanced Micro Devices, Inc. [AMD] Family 15h Processor Function 1
    00:1b.2 Host bridge: Advanced Micro Devices, Inc. [AMD] Family 15h Processor Function 2
    00:1b.3 Host bridge: Advanced Micro Devices, Inc. [AMD] Family 15h Processor Function 3
    00:1b.4 Host bridge: Advanced Micro Devices, Inc. [AMD] Family 15h Processor Function 4
    00:1b.5 Host bridge: Advanced Micro Devices, Inc. [AMD] Family 15h Processor Function 5
    01:01.0 VGA compatible controller: ASPEED Technology, Inc. ASPEED Graphics Family (rev 10)
    01:03.0 Multimedia audio controller: C-Media Electronics Inc CMI8788 [Oxygen HD Audio]
    02:00.0 Ethernet controller: Intel Corporation 82574L Gigabit Network Connection
    03:00.0 Multimedia controller: Philips Semiconductors SAA7164 (rev 81)
    04:00.0 Ethernet controller: Intel Corporation 82574L Gigabit Network Connection
    05:00.0 Ethernet controller: Intel Corporation 82574L Gigabit Network Connection
    06:00.0 InfiniBand: Mellanox Technologies MT26418 [ConnectX VPI PCIe 2.0 5GT/s – IB DDR / 10GigE] (rev b0)

    As you might guess from some of the lines, it’s an AMD server. You’ll notice some USB controllers, likely a SATA controller and any PCI or PCI Express add-in cards (usually at the bottom). In this example we will pass through a digital TV card to a VM so we can record free-to-air TV. The controller here is the fourth-last entry:


    03:00.0 Multimedia controller: Philips Semiconductors SAA7164 (rev 81)


    It’s a Digital Now PCI-E card – as you can see there’s no mention of the brand in the chipset that the system can see, so you may have to make an educated guess (or do some research as to what’s actually used in the card) to determine which one you want. Making note of the above line, we now edit /boot/extlinux.conf:


    vi /boot/extlinux.conf


    In our example system it looks like this:


    # location mbr
    serial 0 115200
    default xe
    prompt 1
    timeout 50

    label xe
    # XenServer
    kernel mboot.c32
    append /boot/xen.gz mem=1024G dom0_max_vcpus=4 dom0_mem=4096M,max:4096M watchdog_timeout=300 lowmem_emergency_pool=1M crashkernel=64M@32M cpuid_mask_xsave_eax=0 console=vga vga=mode-0x0311 — /boot/vmlinuz-2.6-xen root=LABEL=root-ckwntldj ro xencons=hvc console=hvc0 console=tty0 quiet vga=785 splashi  — /boot/initrd-2.6-xen.img

    label xe-serial
    # XenServer (Serial)
    kernel mboot.c32
    append /boot/xen.gz com1=115200,8n1 console=com1,vga mem=1024G dom0_max_vcpus=4 dom0_mem=4096M,max:4096M watchdog_timeout=300 lowmem_emergency_pool=1M crashkernel=64M@32M cpuid_mask_xsave_eax=0 — /boot/vmlinuz-2.6-xen root=LABEL=root-ckwntldj ro console=tty0 xencons=hvc console=hvc0 — /boot/initrd-2.6-xen.img

    label safe
    # XenServer in Safe Mode
    kernel mboot.c32
    append /boot/xen.gz nosmp noreboot noirqbalance acpi=off noapic mem=1024G dom0_max_vcpus=4 dom0_mem=4096M,max:4096M com1=115200,8n1 console=com1,vga — /boot/vmlinuz-2.6-xen nousb root=LABEL=root-ckwntldj ro console=tty0 xencons=hvc console=hvc0 — /boot/initrd-2.6-xen.img

    label fallback
    # XenServer (Xen 4.1.5 / Linux 2.6.32.43-0.4.1.xs1.8.0.835.170778xen)
    kernel mboot.c32
    append /boot/xen-4.1.5.gz mem=1024G dom0_max_vcpus=4 dom0_mem=4096M,max:4096M watchdog_timeout=300 lowmem_emergency_pool=1M crashkernel=64M@32M cpuid_mask_xsave_eax=0 — /boot/vmlinuz-2.6.32.43-0.4.1.xs1.8.0.835.170778xen root=LABEL=root-ckwntldj ro xencons=hvc console=hvc0 console=tty0 — /boot/initrd-2.6.32.43-0.4.1.xs1.8.0.835.170778xen.img

    label fallback-serial
    # XenServer (Serial, Xen 4.1.5 / Linux 2.6.32.43-0.4.1.xs1.8.0.835.170778xen)
    kernel mboot.c32
    append /boot/xen-4.1.5.gz com1=115200,8n1 console=com1,vga mem=1024G dom0_max_vcpus=4 dom0_mem=4096M,max:4096M watchdog_timeout=300 lowmem_emergency_pool=1M crashkernel=64M@32M cpuid_mask_xsave_eax=0 — /boot/vmlinuz-2.6.32.43-0.4.1.xs1.8.0.835.170778xen root=LABEL=root-ckwntldj ro console=tty0 xencons=hvc console=hvc0 — /boot/initrd-2.6.32.43-0.4.1.xs1.8.0.835.170778xen.img

    Rather an intimidating-looking file if you’re new to *nix config files. Fortunately, we can ignore most of this and just pay attention to the last line in the “label xe” section at the top. The line we want to edit is:


    append /boot/xen.gz mem=1024G dom0_max_vcpus=4 dom0_mem=4096M,max:4096M watchdog_timeout=300 lowmem_emergency_pool=1M crashkernel=64M@32M cpuid_mask_xsave_eax=0 console=vga vga=mode-0x0311 — /boot/vmlinuz-2.6-xen root=LABEL=root-ckwntldj ro xencons=hvc console=hvc0 console=tty0 quiet vga=785 splashi  — /boot/initrd-2.6-xen.img


    Looking at the line we wanted from lspci above, we want the number at the front – in this case:


    03:00.0


    Add the following near the end of the config line – inbetween “splashi” and “—“:


    pciback.hide=(03:00.0)


    The line should now read:


      append /boot/xen.gz mem=1024G dom0_max_vcpus=4 dom0_mem=4096M,max:4096M watchdog_timeout=300 lowmem_emergency_pool=1M crashkernel=64M@32M cpuid_mask_xsave_eax=0 console=vga vga=mode-0x0311 — /boot/vmlinuz-2.6-xen root=LABEL=root-ckwntldj ro xencons=hvc console=hvc0 console=tty0 quiet vga=785 splashi pciback.hide=(03:00.0) — /boot/initrd-2.6-xen.img

    Note the space on either side – one between splashi and the new text and one between the hyphens and the new text. Now run:


    extlinux -i /boot


    Then shut down any VMs and reboot the server:


    reboot


    Once it is back up, we need to find the UUID of the virtual machine we want to pass the device through to. Run:


    xe vm-list


    This will return a result for every VM on the system – it might be quite long! If it is a long list you may wish to pipe it to the less command for easier viewing:


    xe vm-list | less


    If you aren’t familiar with less you can exit with the “q” key. Sort through the list until you find the VM you want to pass through to. In this example it is:


    uuid ( RO)           : 6b664553-6822-b445-5a8c-c10d93c41c4c
    name-label ( RW): bacchus
    power-state ( RO): halted

    Now we can add the PCI device to the config of this VM:


    xe vm-param-set other-config:pci=0/0000:03:00.0 uuid=6b664553-6822-b445-5a8c-c10d93c41c4c


    Breaking that down:


    xe vm-param-set other-config:pci=0/0000:[PCI address for the device] uuid=[UUID of VM]


    Starting the VM – in this case a Windows 7 VM – we can check for the device to see that it has appeared (in this case the drivers were already installed so it has been immediately identified):
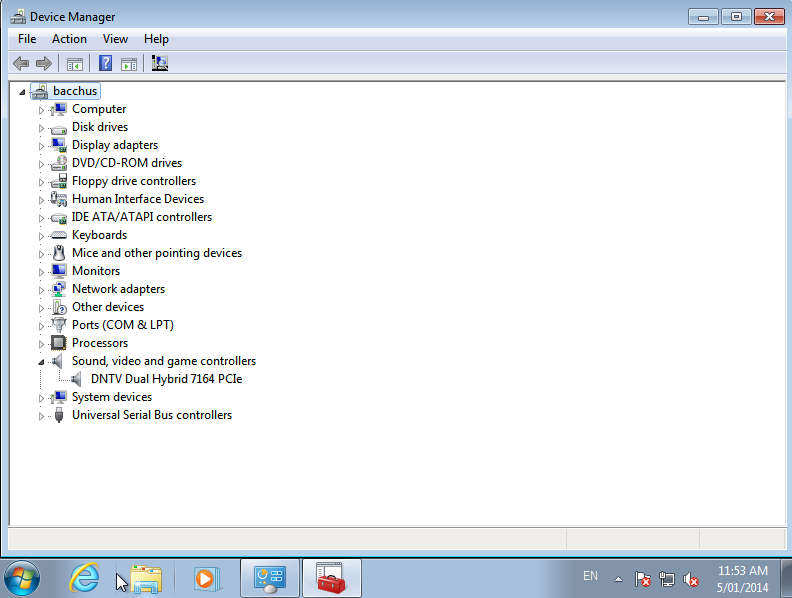
     

    xenserver-passthrough-to-windows

    Success! In a Linux system you should be able to do:


    lspci


    to see the newly passed through hardware.

  • Ubuntu: How to add or append a file to an existing tape backup


    Sometimes you may with to add files to an existing backup; if you issue a command like:


    tar -cvf /dev/st0 backupfiles


    …and the tape is not already set to the end of the previous archive you will over-write any data from the position on the tape. Use the “eom” command to move the tape to the end of the alread-recorded files like so:


    mt -f /dev/[path-to-tape] eom


    e.g.:


    mt -f /dev/st0 eom


    Now you can use tar to add a file to the tape without over-writing the existing data.

  • Ubuntu: Using compression on your tape backups


    If you have compressible data you may save space on you tapes by using compression; this comes at a cost of CPU cycles to do the compressing, which can often be a worthwhile tradeoff for a long-term backup. To do this is quite simple – add in the -z switch to your tar command.


    tar -cvzf /dev/[tape-device] [folder or files to back up]


    e.g.:


    tar -cvzf /dev/st0 /opt/movies


    For some file types – e.g. movies, mp3s, compressed picture files and the like you probably won’t see a great deal of space saved – though if it enough to save you from using two tapes instead of one, it may be worth it even so. Text and other file types may compress more easily and you may see more of a savings – it will vary greatly depending on your dataset. Try it and see!


    Sometimes you may see people using the -j switch instead – this uses the bzip2 algorithm rather than the gzip algorithm (the -z switch). You will probably find that gzip is slightly better supported and bzip2 sometimes provides slightly better compression but takes longer. If you are chasing better compression it may be worth replacing the z switch with j to see if it helps.

  • Ubuntu: Using tar to span a backup across multiple tapes


    Following on from the article on writing files to a tape backup, what happens if you want to back up more than what fits on a single tape? Here we want to use the –multi-volume switch, or -M. Use it so:


    tar -cvMf /dev/[path-to-tape] [backup folder or files]


    As a working example:


    tar -cvMf /dev/st0 /opt/movies


    Once the first tape is full, tar will prompt you to insert another:


    Prepare volume #2 for `/dev/st0′ and hit return:


    Make sure you replace the tape with another before hitting return or else it will over-write the just-finished tape!


    With the exception of a file which sits across multiple tapes (think of a file which starts at the end of one tapes and finishes at the start of the next) you don’t need a first tape to restore the files on the second. You also cannot use compression for multi-volume archives.

  • How to test and check a HP StoreWorks Ultrium tape drive


    With used tape drives falling in price they are now finding their ways into the hands of more home storage enthusiasts; one should be wary about purchasing a tape drive in unknown condition, though, as there’s a good chance that it may be faulty or require servicing. One way to check the status of the tape drive for HP units is their Library and Tape Tools software – currently available from here:


    http://h18006.www1.hp.com/products/storageworks/ltt/


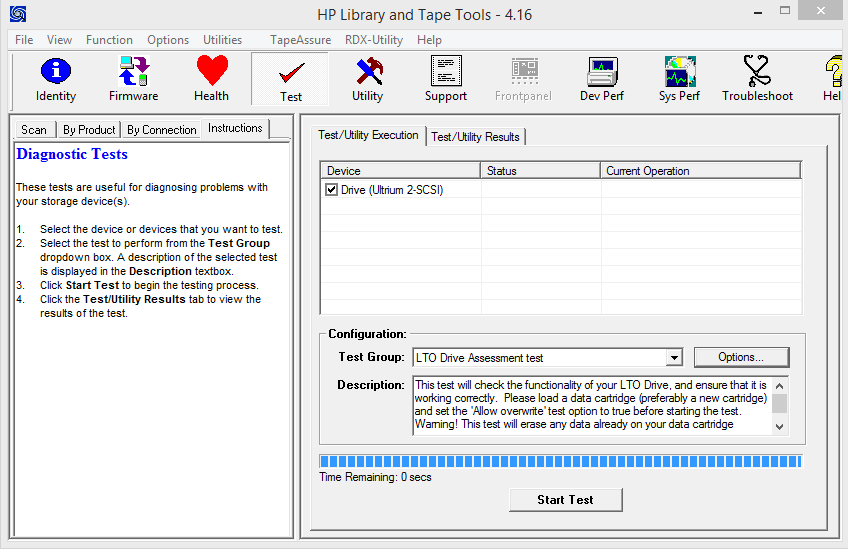
    To run a test, open L&TT and click on the Test tab:


    hp-library-and-tape-tools-test-01

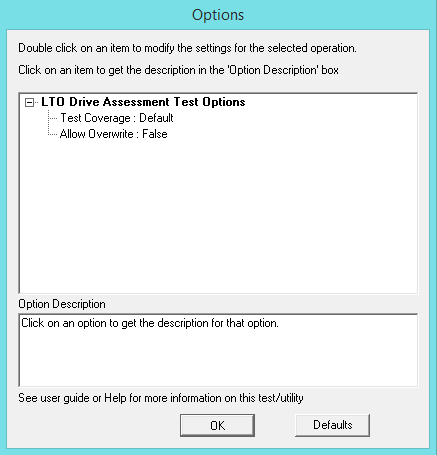
    Insert a tape into the drive that is blank (or has data you don’t mind being over-written), click on Options:


    hp-library-and-tape-tools-test-02


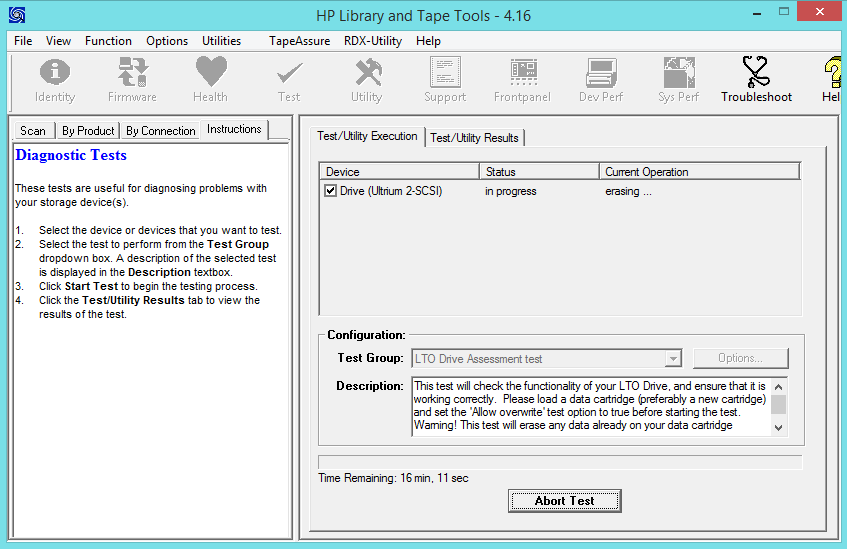
    Click (or double click) on Allow Overwrite and change it to True, then click OK. You will be returned to the previous screen. Click “Start Test”.


    hp-library-and-tape-tools-test-03

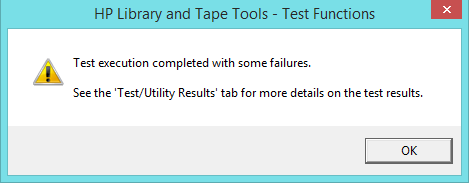
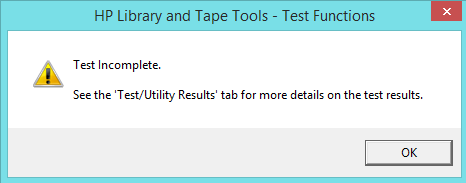
    What you don’t really want to see is a pop-up a couple of minutes later like this:


    hp-library-and-tape-tools-test-04

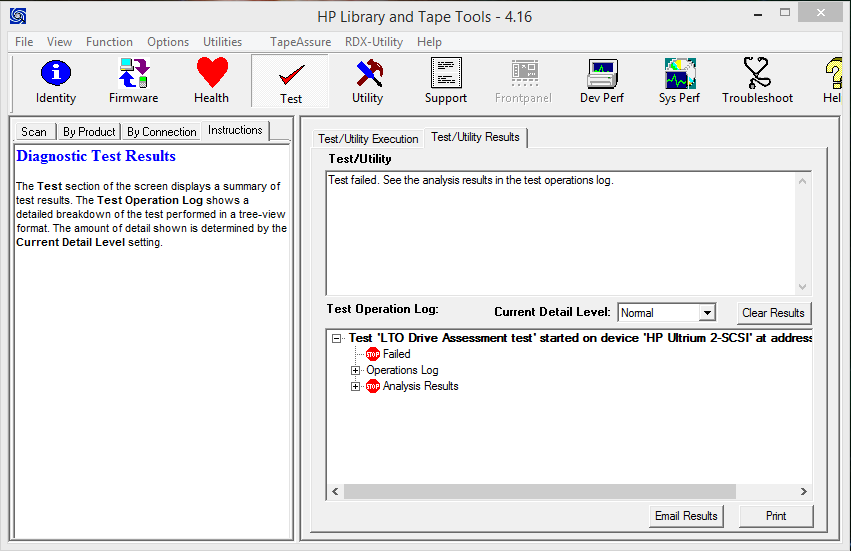
    Time to look at the Test/Utility Results tab:


    hp-library-and-tape-tools-test-05

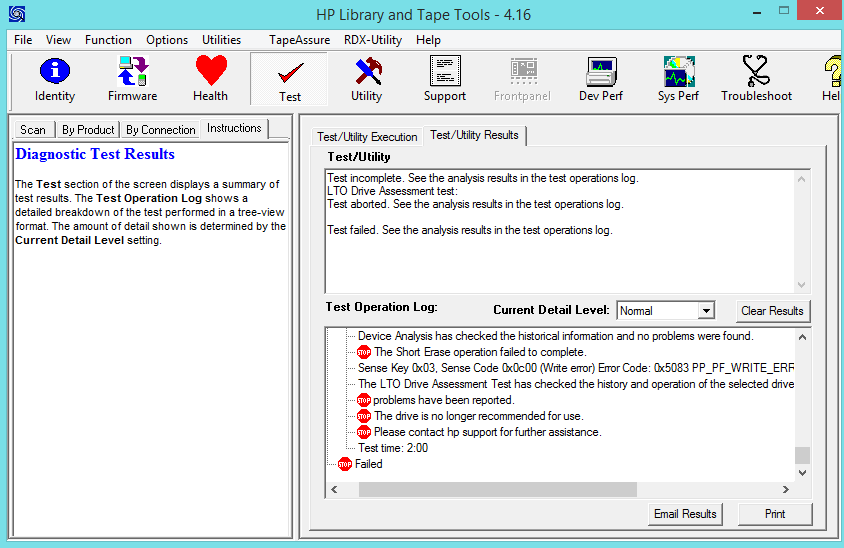
    From here we can expand the Analysis Results to see what has happened:


    hp-library-and-tape-tools-test-08


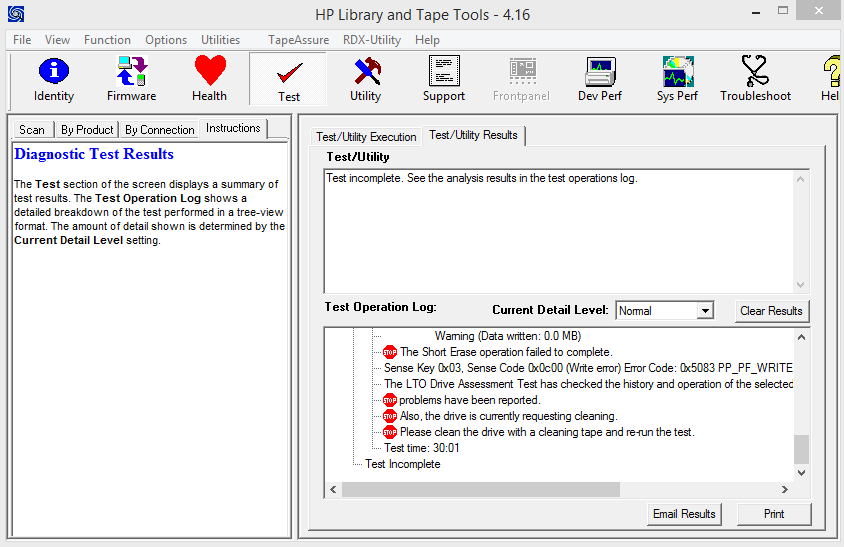
    Another possible result is an incomplete test:


    hp-library-and-tape-tools-test-06

    This can sometimes happen because the drive needs cleaning – if you open the Analysis Results you will see a request for cleaning if this is the case:


    hp-library-and-tape-tools-test-07

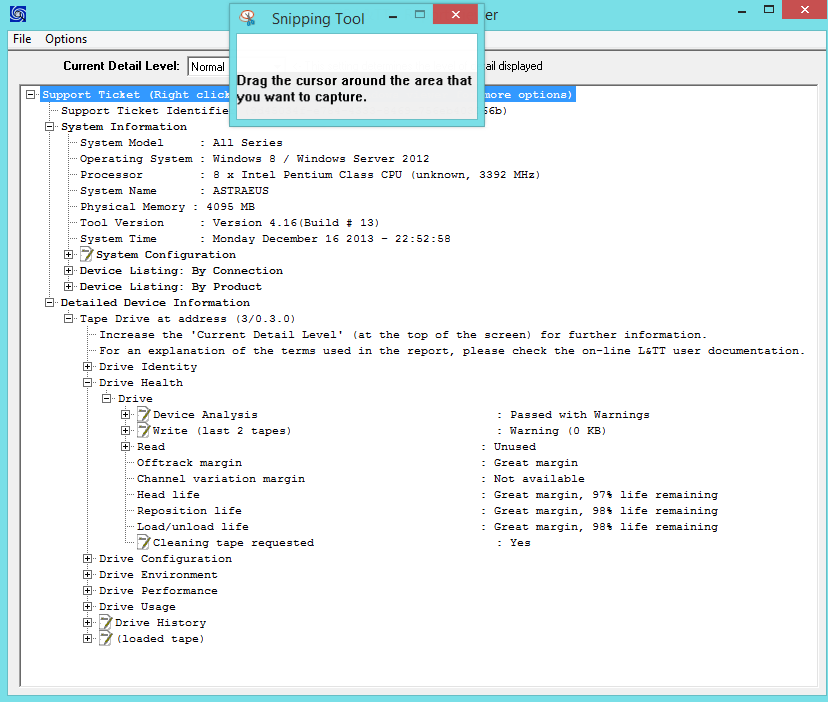
    Hopefully, though, you get a passed test with no issues such as these! To get a detailed report of the drive status we can use the Report Viewer – click on the Support tab at the top, then Refresh Device Data, then View Support Ticket. You should see a report with expandable headings which provides a great deal of information, e.g.:


    hp-library-and-tape-tools-test-09

    There is a wealth of information here, covering both the drive and the tape inside. Worth checking over for any anomalies if you have just received a new drive!

  • How to update the firmware of a HP tape drive – StorageWorks Ultrium 448


    The quickest and easiest way of updating the firmware is through HP’s Library and Tape Tools – at the time of writing it is available here:


    http://h18006.www1.hp.com/products/storageworks/ltt/


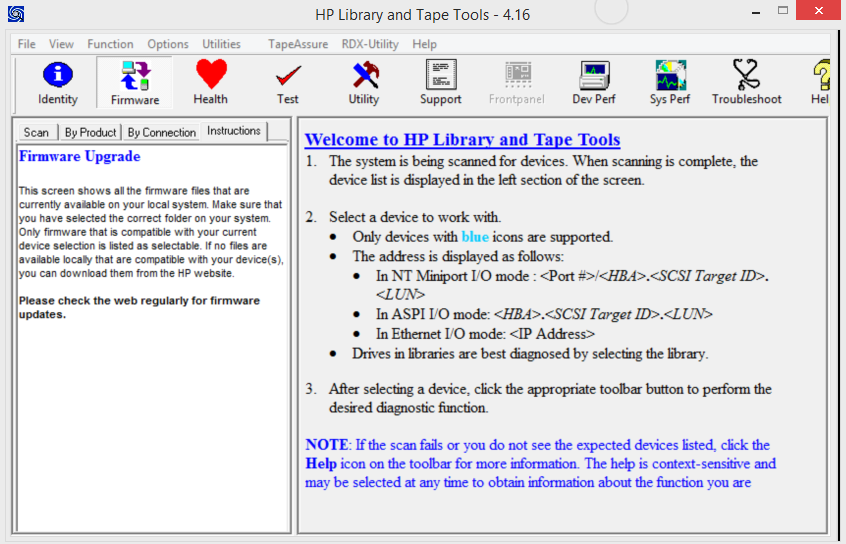
    Click on the “Link to free download” link to acquire the software. Assuming you have the correct drivers for your setup (SCSI/SAS/etc card), the tape drive is connected and powered on you will be able to detect it using LTT. Click on “Firmware” at the top:


    hp-firmware-01

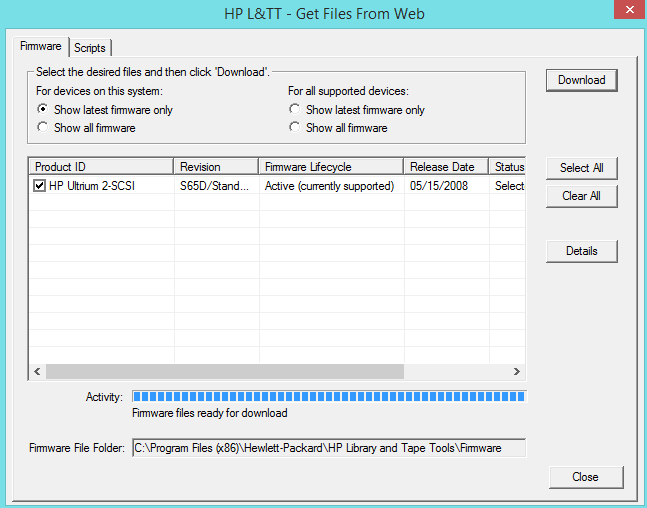
    Now click “Get Files From Web”, then select your tape drive/firmware and click Download:


    hp-firmware-02


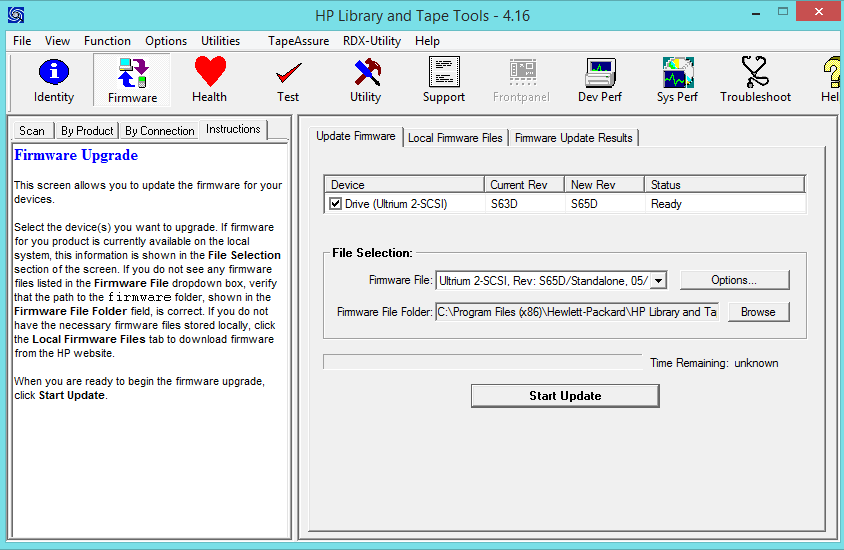
    Once it has download, exit that screen and click on Firmware again:


    hp-firmware-03

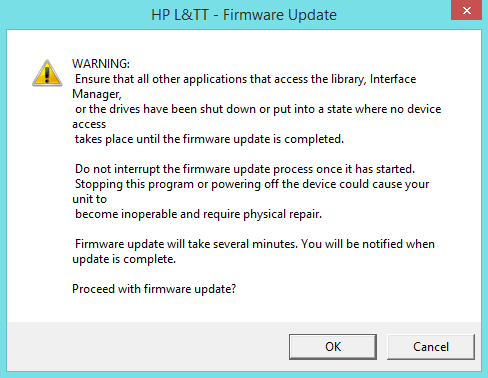
    You should be looking at the Update Firmware tab by default, if not select it and you should see the above screen. To update the firmware now (once checking that all of the numbers look as they should!) click Start Update. You will see the following warning message:


    hp-firmware-04


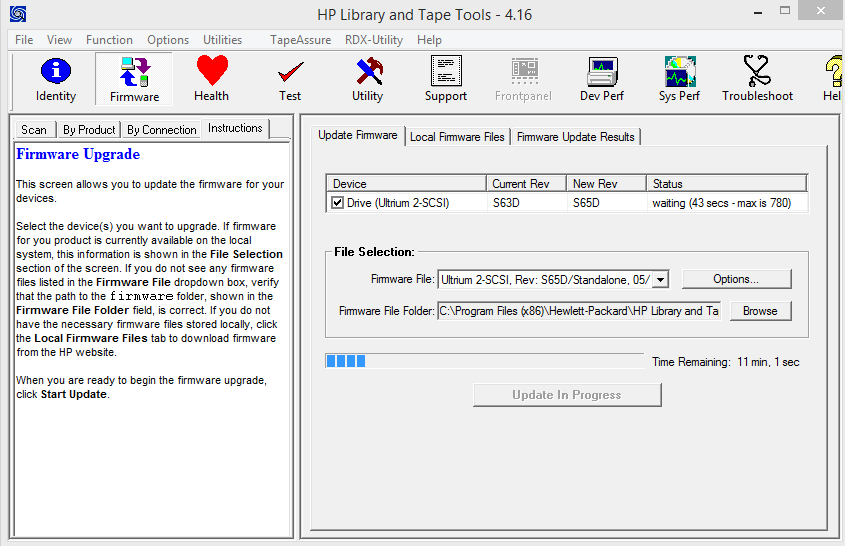
    After that, you should see:


    hp-firmware-05

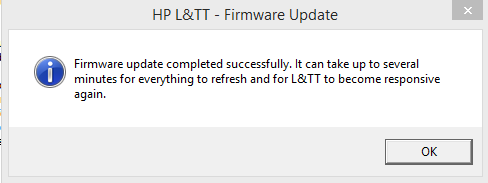
    We find that the Time Remaining is usually reasonably pessimistic and that it generally finishes early. Once the update is complete you will get the following popup:


    hp-firmware-06


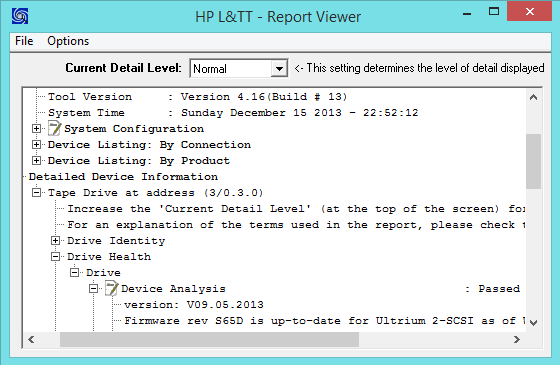
    Once LTT comes back to life, your update should be completed and you can check it through the Health tab, which should pop up the Report Viewer:


    hp-firmware-07

    There’s plenty of info in there so it’s well worth checking to see how much life is remaining on the drive.


    Done!

  • Windows 8 or 8.1 – how to change default program for opening files


    Another Windows 8/8.1 question from someone who wanted to stop their OS opening PDFs with the default Win8 app and instead use SumatraPDF.


    Hit the Windows key to bring up the Start screen and type “defaults”. Then select Default App Settings and you’ll be presented with a screen showing a few common file types. Chances are the one you want won’t be there, so at the bottom there’s an option “Choose default applications by file type”, which will bring up a huge list. Navigate to your desired extension, click on the icon to change it and you’re done.